3

Is there a special tool/setup for achieving a consistent thickness of thin stock that leaves a planed/smooth finish? Something like I imagine is used for Kumiko members?

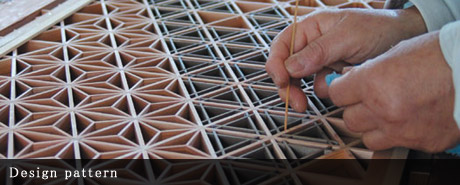
enter image description herehttps://www.tanihata.co.jp/english/kumiko/index.html

I roughly imagine something like a thickness planer except without the spinning blade. Or maybe there's a way to clamp blocks to the side of a plane or something such that the blade no longer engages when the target thickness is achieved?

It seems like there would need to be some sort of mechanism in the role the pressure rollers play in a thickness planer, to keep the thin stock from being lifted off the bench or reference surface in response to the planing action.

2 Answers 2

3

You can devise a jig of some kind to help in making multiple pieces of smaller size but at heart producing strips of wood like this doesn't have to be any different from getting a board to final dimensions for the face of a drawer, a shelf, the side of a bookshelf etc. etc.

The thinner dimension does mean you have to be more careful in sizing as there's a smaller margin of error allowable, but the basic principles remain the same.

For pieces of small cross-section often you'll saw roughly to size from a larger board, i.e. resawing or ripping lengths from it, after that the same process you'd use to make a shelf to the size you want comes into play.

You start with one face of each piece (usually you pick the one that's flattest already, sometimes the side with the best grain) which becomes your first reference or datum surface — the face side. After it is flattened and smoothed then you plane an adjacent edge — the face edge — dead square to the face side. Once these are established (and marked so you don't lose track of them) you can gauge lines for width and thickness from them, then you plane to final dimensions. Working from surfaces you know to be straight and square helps in producing a finished board that's straight and square.

This is a fundamental of hand-tool woodworking, laid out in any good book on the basics for learner woodworkers, e.g. Robert Wearing's The Essential Woodworker which many good city libraries will have a copy of. Online, there's a very detailed show and tell of the entire process starting from rough-sawn wood available on Wood and Shop's site, How to Square, Flatten, and Dimension Rough Boards with Hand Tools.

If you had to produce a great number of lengths of wood to exacting standards it does become a process that perhaps is best jigged, for speed as well as to help with consistency, and actually Robert Wearing would be a fan of that sort of thing. I think he covers something applicable in one or more of his other books on jigs and workshop aids.
2
  • Based on your answer I found this link that gives an idea what a jig might look like: finewoodworking.com/2015/12/17/…. I was surprised at first that it didn't need any separate "pressure" members to keep the stock down on the bench, but worked out that the sole of the plane does that, apparently quite effectively :) Just what I was looking for, thanks Graphus :)
    – scanny
    Commented Mar 8, 2017 at 22:33
  • It's been a while since I've seen it but if memory serves Wearing's is very like that. One thing to note about how this one is implemented, if you don't have a front vice (or just would prefer not to use it for this) the jig can have a 'hook' put on the front edge at the bottom so that you can plane across the bench instead of along it, which I find preferable for shorter pieces.
    – Graphus
    Commented Mar 9, 2017 at 8:16
2

EDIT: Oops, appologies. I didn't note the "hand tools" in your title. If you've got a lot of this to do, a router table is the way to go (unless you have a drumb sander).

By hand, maybe try a cabinet scraper. Cut two wooden triangles from 1" stock. A base-to-height ratio of 4.5":6" gives a 60° angle. Cut out some of the interior so you can clamp the scraper to the angled faces. Use stock that is overly long so you can clamp the ends to your work table. Your table supports the bottom of the stock and probides a surface to run your scraper-jig over. The height at which you clamp the scraper ultimately gauges the thickness. Sharpening and burnishing a cabinet scraper is an art.

By router: I'll assume you have a way of resawing the stock into narrow strips and are concerned about producing a smooth face. A band saw is my preference for the resawing but a well set-up table saw will do.

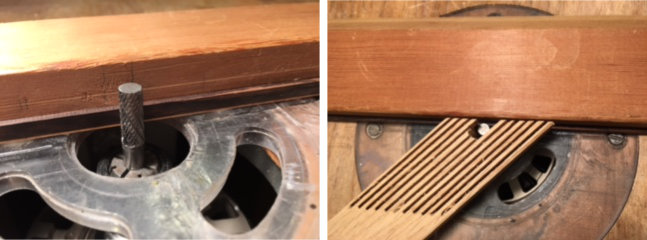
The trick with the router table is to use a fine carbide die-grinding bit in place of a standard router bit. Trap the stock between the bit and the fence and use "fingers" to hold the stock securely against the fence as well as keeping your fingers out of the bit (right image). I've made purfling for guitars paper-thin with this technique. You may have to search on-line for a quality bit. Preferably work with closed and tight grain woods. Although the rosewood in the images was anything but.

You can't remove a lot of material with this technique. It may take multiple passes if your resawing was fat. Be sure the bit is square to the table and parallel to the fence.

enter image description here

You may note the stock here is laminated, maple on top, rosewood on the bottom. The stock to form this was also made in the manner described above.

2
  • Very interesting bpedit! This is like a miniature surface planer with non-marring pressure rollers :) What is the importance of using a carbide burr instead of say, a conventional carbide straight bit? Does it perhaps reduce the tendency of the bit to deflect/pull the stock into the blade?
    – scanny
    Commented Mar 7, 2017 at 20:13
  • @scanny. The main advantage is no chipping and no chatter. Also,this bit is more forgiving of any grain issues and will not pull the stock into the bit as you surmise. Not so important for thicker stock but, as stated, I've trimmed stock to about 0.2 mm. For thicker work you could use a router bit but make it a spiral that pulls the stock toward the router. The spiral bit would probably work for your application, I'd recommend a 1/4" diameter.
    – bpedit
    Commented Mar 7, 2017 at 21:39

Your Answer

By clicking “Post Your Answer”, you agree to our terms of service and acknowledge you have read our privacy policy.

Not the answer you're looking for? Browse other questions tagged or ask your own question.