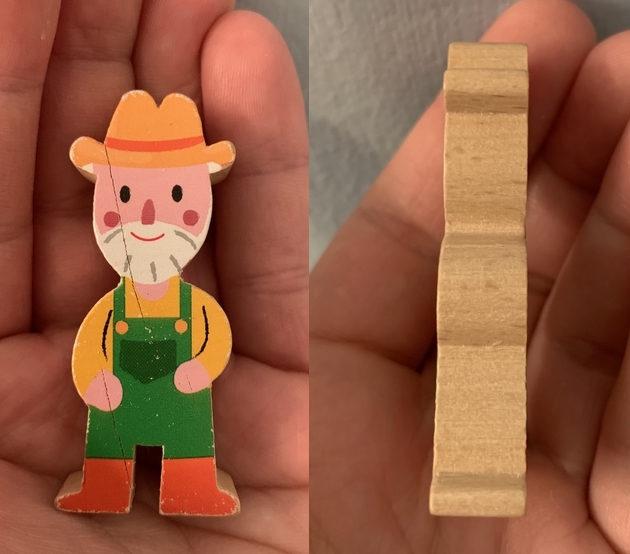
What type of saw, or would I need a CNC router to do this?
On the face of it, a scroll saw seems like the obvious choice. However, when you want to make a lot of something, it's a good idea to try to reduce the number of operations that you need to do per item. For that reason, I'd look at using a band saw, and specifically a 14" band saw, not a dinky little benchtop one. A typical 14" bandsaw can cut material up to 6" thick, and twice that if you add a riser block; a benchtop bandsaw is usually limited to about 3 1/2".
My thought is to cut the profile from a single, thick workpiece, so that you end up with one figure that's maybe 6" thick, and then slice that into several final-thickness figures. That'll save you a LOT of time compared to cutting each one out individually. Frankly, even a small band saw would let you do five or six at a time, which is still a huge improvement over one at a time.
Trying to cut a tall, skinny thing on a bandsaw is error-prone and dangerous, so start with a large workpiece and lay out as many figuress as you can fit. Try to do it such that you can do most of the shaping on the saw without cutting each blank free from the larger piece; that way, you'll be working with an object with a large base until you free them at the end. After you've cut the blanks free, sand the cut sides. You glue sandpaper to pieces of some of the waste material to make custom sanding blocks that will make sanding to much quicker.
Change to a wider, thin-kerf blade on the bandsaw and use the fence to slice each blank into figures. You'll want to practice a bit on scrap first; even with a fence, cutting a nice straight line on a bandsaw takes some getting used to. It's the best tool for the job, though, because a band saw takes the narrower kerf than any other saw except for a scroll saw.
A stationary disk sander or belt sander will help you sand the cut faces smooth. If you're really making a lot of these guys, take the time to make a jig that'll hold the figure and assure that they're held flat and sanded to a uniform thickness. I think that's really a whole other conversation, but the idea is to be able to insert the figure into the jig, sand it without having to think, flip it over and insert in another spot in the jig, sand again, and end up with a figure that's exactly the same thickness as all the others.
After that, you're ready to paint them. Again, that's probably a separate conversation, but I'd go with stencils and an airbrush to do as much as I could. This is an easy place to introduce some variation if you want to: you can just change the colors you use with the same stencils so that some have, say, a blue shirt and hat, and red overalls, different skin tone, etc.
If you really want to make a LOT of these figures, e.g. thousands, cutting them out a dozen at a time with a band saw isn't going to work very well. Instead, you'll want a spindle shaper, preferably one with three spindles. You'll also need three sets of custom knives: one set for each side, since those are different, and one for the top. You could get away with just two sets if you redesign the figure to flatten the brim of the hat and get rid of the crease in the top of the hat. Cut the gap between the legs with a table saw before you start the rest of the shaping.
Looking at your example figure, you can see that the two faces of the piece are end grain, which is why it's showing some cracks. I think it was probably made by using a shaper to cut the profile into one long stick, and then slicing the individual figures off that stick as above. Using a shaper would give you very consistent results, and might even eliminate the need for sanding.
