4

I recently had a friend ask me if I could help him repair some office chairs by replacing the entire back piece with a wooden one as there are some cracks progressively getting worse down the back of the support which you can see in the photo.


So when brainstorming ideas on how to actually go about this there were only really 3 things I could come up with that could work but they all had their own issues:

  • Making some sort of jig to then use a router - Would still require a lot of sanding and the jig wouldn't work all too well

  • Using either one of the rasp or plane blades for an angle grinder on a big blank - Would not really be easily replicable and also extremely easy to screw up the entire piece

  • CNC machine - CNCs are only recently really becoming super mainstream in woodworking so many people still do not have one


So after that it got me wondering how this could actually be done in a replicable way. Now I see that a CNC would be the easiest way to make this "organic" shaped piece and others like it but I can't be the only person without a CNC so was wondering what ways people make pieces such as without machines like CNCs
2
  • As @Graphus says, lamination is the way to go.
    – bpedit
    Commented Jan 22, 2017 at 18:19
  • Has anyone given any thought to a pantograph? Get a back mocked up and then use the pantograph to make copies. As has been suggest, I would lean toward a lamination.
    – Kyle
    Commented Jan 22, 2017 at 21:08

3 Answers 3

9

Lamination FTW
If the chair were a different type I'd have suggested solid wood (note: grain must go horizontally), but not for one like this. Laminating up a curved plywood back is the way to go here IMO as already suggested in @keshlam's Answer. Only one potential problem with this plan, and that is getting the thick veneers to do the lamination or cutting them yourself.

BTW you know these have to be glued up on a curved form, don't underestimate the amount of time making that will take.

And if you don't also make a reverse-curved one as well (female or male, depending on whether you decide to go curve-up or curve-down on the main form) you'll need a lot of clamps to make each back, and it would probably be worth using clamping cauls as well. Figure at least eight strong clamps tied up each time while the glue dries so factor that into your estimates of how long the whole process will take.

If you did want to make it from solid wood
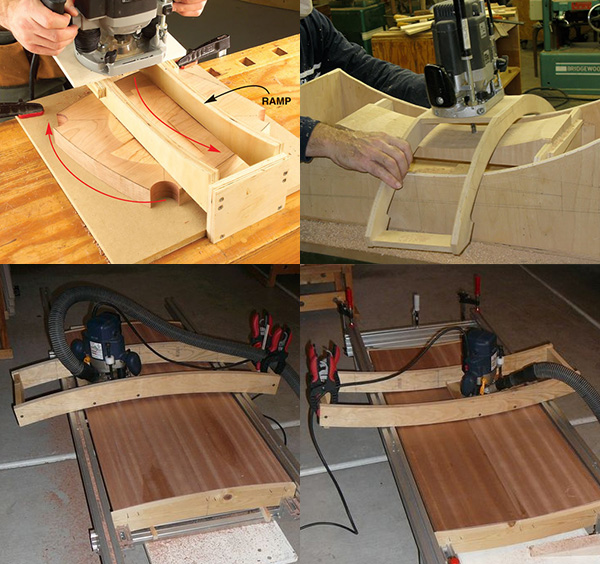
Even though I'm a handtool guy primarily because of the relatively specialised nature of the shaping of one side of each back* this has power tools written all over it. And the main one to get this type of thing done repeatably and accurately is the router, with an appropriate jig.

Making some sort of jig to then use a router - Would still require a lot of sanding

You're underestimating the surface you can get with a router. Just generally if your bit is sharp, you use good technique (appropriate feed rate, best routing direction relative to the grain) and you take a very shallow final pass you can get nearly finish-ready surfaces straight from the router.

Plus anyway, if the surface left by the shaping operation on this project were a little rough you should always be looking at planing or scraping before sanding. Scraping is like sanding on steroids. It's faster, produces a better surface and it doesn't use up a consumable product. What are the differences between sanding and scraping?

and the jig wouldn't work all too well

If made well and used right jigs for this type of shaping can work superbly. Here are a few images showing the usual types made:

enter image description here


*Ideally done with a compass plane, which are rare and can be expensive.

2
  • Thanks so much for the answer. I was thinking the entirely wrong way about the jig, and those pictures helped a ton. I think I am going to pursue the lamination technique after you and keshlam offered it up, but if I can't get that the way I want it those jigs look extremely plausible. Thanks for the help!
    – mvr007
    Commented Jan 23, 2017 at 6:12
  • @mvr007 Welcome. As neither of the previous Answers had covered that kind of router jig I thought it best to say something about them and include pics. They're not really needed for outside curves (since that can be done using a normal hand plane quite easily) but invaluable for inside curves.
    – Graphus
    Commented Jan 23, 2017 at 8:06
5

If the back is curved, I would suggest laminating layers of bending plywood over a form to get that curve, then trim to the oval shape with bandsaw/saber saw/handsaw, a trifle oversize, then file/rasp/sand to final shape and size.

1
  • I did not even remotely think of this, this is kinda how they make skateboards I think?. Anyway thanks! Will for sure look into this option.
    – mvr007
    Commented Jan 22, 2017 at 7:51
2

You can create the outer shape by making a template for the back, cutting the workpiece to rough shape with the saw of your choice (probably bandsaw or jigsaw if using power tools), and using a router with a pattern bit or guide bushing. You can either make the template for the entire back, or slightly more than half of the back (since the left and right sides will be mirror images of one another). If you do the half-template, make sure you have some registration marks to help line it up when you flip it.

If you want the face of the back that has padding attached to it to also be slightly concave, you have at least a couple options.

You could shape the concave/convex faces on your bandsaw if you first rip the back into strips small enough to resaw, then glue the strips back together.

If you don't have a bandsaw or don't want to mess with ripping and gluing, you can use the same technique that is commonly used to carve the seat of a chair. Drill holes at various locations to appropriate depths across the back, then use hand tools or power tools to slowly carve away material until you can no longer see the holes.

If you use hand tools, you could simply use a smaller size hand plane or specialty plane to scoop out the concave face.

Another power tool technique is to use an angle grinder with a power rasp or carving/planing attachment to gradually carve away a little at a time in smooth sweeping motions. A couple example manufacturers of these attachments are King Arthur Tools and Arbortech. You could also potentially use a very aggressive sander, but that will take a bit longer.

Your Answer

By clicking “Post Your Answer”, you agree to our terms of service and acknowledge you have read our privacy policy.

Not the answer you're looking for? Browse other questions tagged or ask your own question.