I just want the ability to countersink (occasional use) and I have 6-7-8mm head screws and I'm buying a single 8.3mm countersink bit (Makita HSS P-73542 3 flute). But what's stopping me from not drilling with it all the way, just stop when the hole reaches ~6mm diameter for example? Officially, does the countersink bit need to reach its "max" diamater, THEN (by pushing it more) make a tiny half-mm straight "wall" for the side of the screw head? If that tiny wall is needed or I need more precision I guess I could even finish it with a 6mm normal wood drill bit, no?
2 Answers
It's perfectly fine and common practice to use a countersink bit that is bigger than the taper you make with it, regulating the taper diameter by how deep you go.
A vertical wall above the taper is known as a counterbore (as it is also known when there's no taper).
A combined countersink/counterbore that leaves a flat-head fastener exactly flush with the surface is very fancy, but it's very common, at least in my experience, to simply have the countersink when using flat-head fasteners.
-
Depending on the material, it might work (emphasis on might) to countersink to the head's exact diameter and then tighten it enough to mash itself in for the last ~0.5mm or so. Doesn't always work though. It's basically another method to split, given the wedge-shaped head, and it might depress the surface in that area by compressing the material under and around it, so you'll have to weigh those risks.– AaronDCommented Dec 2, 2016 at 5:49
-
@AaronD raises a good point. Unlike in metal, the depth of a countersink in wood is unlikely to be the precise point where your fastener stops moving further into the wood. Especially in soft woods, plywood, MDF, etc., you'll probably need to experiment to determine just how deep to countersink to get the screw head depth you want.– scannyCommented Dec 2, 2016 at 7:21
-
It sounds like you're using a 2:1 and wanting to drill and countersink in one operation. Some 2 part counter sinks can have the bit in the center adjusted, just as you can buy countersinks that affix to regular bits with set screws. Making this adjustment, or purchasing a secondary countersink might be the way to go. Using a drill press with a depth stop is the ideal way to do this. Commented Dec 2, 2016 at 17:54
It's actually standard practice to use a countersink bit that's larger than the countersink depression you will make in the wood, precisely because you don't want that little vertical side wall1 usually.
In the past 'rose countersinks' were one of the most common types (used in swing braces) and these could have heads 1/2" or larger in diameter and they were definitely not using screws with heads half an inch across most of the time :-)
But what's stopping me from not drilling with it all the way, just stop when the hole reaches ~6mm diameter for example?
Nothing really. Couple of reasons you might not want to, but you can if you like.
It is usual practice for the countersink mark in the wood to be just deep enough to accommodate the screw head so that it sits flush with the surface2. This is a convention only but does tend to look neatest. Deeper countersinks (i.e. wider countersinks) can look crude or sloppy. Obviously this is if the screw head is on show, for non-show surfaces it really matters very little what you do as long as the wood hasn't been chewed up.
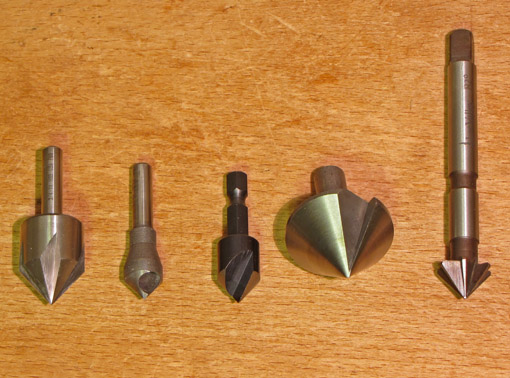
That's the second reason you may not want to do this commonly, once a countersink bit bottoms out there can be a tendency for it to start chewing up or burning the wood because it's not designed to go in further, but note that this is dependent on countersink design — there are four or five major types today from what I've seen on sale and they don't all work exactly the same. Here's a selection someone else lined up for comparison:
Source: Countersinks, poor to excellent on the Heartwood blog.
Also note that countersink sharpness is everything. Even the best design won't create clean, neat countersinks in wood if it's not sharp. All designs can be sharpened by the user with care, but HSS bits may need a diamond file or a small diamond plate rather than a common needle file or warding file made from hard steel.
Tip: with some designs of countersink it's best to do your countersinks first, then drill your clearance holes. If you drill the clearance hole first and then try to countersink at top as is most frequently done (and very often recommended) you can get bad chatter and it can create oval or uneven countersinks. But this needs to be tried with each countersink bit and in scraps of the wood you're using as the hardness and uniformity of the wood makes a difference here.
1 Where you do want that you're creating what's called a counterbore and for that you may not need to countersink at all. You could just drill a large enough hole to accommodate the screw head and then drill the clearance hole for the screw shaft in the centre of the hole formed. There are also combination pilot/clearance/countersink bits available to do all three operations in one go, a huge time saver if you have a lot of screws to do.
2 Next most common would be slightly deeper so the head of the screw sits just below the surface of the wood. You can countersink deeply, which is fairly commonly done when screwing into the top of workbenches as well as on jigs or workshop aids used with hand tools, to make sure that a plane iron or chisel won't accidentally bump into a screw head.
