11

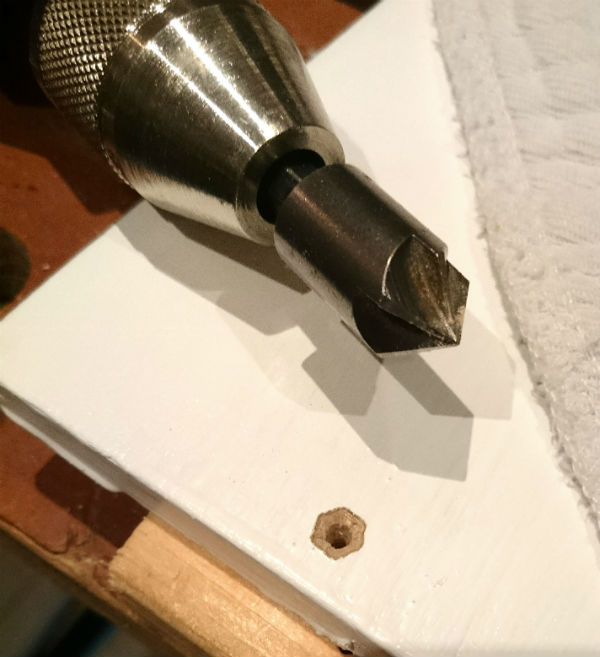
Every time I use my countersink bit, it creates a hexagonal hole.

enter image description here

I've tried a hand drill, an electric drill, drilling fast, drilling slow, soft pressure, firm pressure - virtually every time it will create a hexagonal hole. Of the 12 I drilled yesterday, only one was round, and that felt like it was due to that being an abnormally soft area in the wood.

Is it the design of the bit? I'm sure the one my dad used when I was a kid had many more vanes.

Or is it something I'm doing wrong?

Basically, how do I get a circular countersink?

SOLUTION:

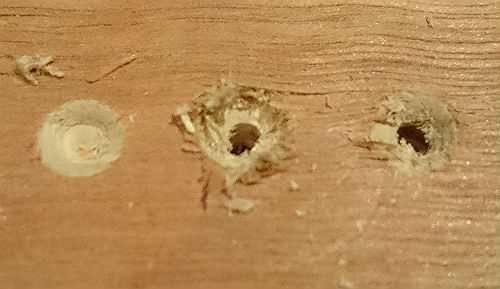
Tried out some of the suggested solutions last night, from L-R is:

  1. Countersink before hole
  2. Large standard drill bit
  3. Hand-turned countersink

Countersinking before drilling the whole is clearly the best, at least for the plywood I'm using. The hand-turned bit could potentially work with a bit more care too; the hole itself is nice and round. Maybe needs a sharper bit.

enter image description here

(Apologies for picture quality)

UPDATE: I had to do a couple more last night, but forgot to countersink first; the hand-turned technique worked really well in the painted plywood, although it took care to keep it centred.
1
  • I see this too. Hexagon shaped countersink surfaces in wood and aluminum. Probably a drill press and vise would produce a more perfect looking countersink. I think most of the 'of the shelf' counter sink bits are not very sharp to begin with and get dull rather quickly. I wonder if a bladeless fine grit face type bit is available. I'd like to see how that might work.
    – John
    Commented Nov 15, 2020 at 19:47

7 Answers 7

7

Is it the design of the bit?

Yes I believe that's partly it. But it's almost certainly not the only issue and the main one I think is that it's not sharp enough — this type of countersink rarely is from what I've seen.

I have three of what looks like exactly the same countersink and every one of them was not sharp straight from the package, and I have seen many others on sale that appear to be just as (not) sharp.

Definitely sharpen the bit if you can manage it as a first step to solving the problem.

Sharpening mine did improve performance, although it wasn't an absolute fix. In use the technique that seemed to help the most for me was to run the drill fast and use light pressure, with a very firm hold on the drill. This worked far more reliably than using low speed and firm pressure.

Another tip I read just the other day that you might like to try: countersink before you drill the clearance hole. I haven't been in a position to try it myself or I'd report on its effectiveness firsthand but apparently it makes a big difference.

3
  • Good tips there, I'll give them a go. Commented Dec 15, 2015 at 14:55
  • Slowing the drill way down is the generally used remedy for countersink bit chatter. Countersinking before drilling works really well.
    – Jason C
    Commented Dec 16, 2015 at 5:40
  • Tried a few tips out and countersinking first is the way to go, so I've marked this the answer! Commented Dec 18, 2015 at 10:58
7

That's almost certainly due to the bit chattering.

You write that you already tried various speeds, but that's really the solution. Do not run too fast (try half the speed). Apply firm, controlled (but not too brutal, this causes chatter, or locking) press, and keep a steady centered hold as much as possible.

Using a drill press if you have one, or a drill rig, will help keeping it centered a lot more easily and more accurately, and applying the correct amount of pressure is a lot easier, too (plus, you have a stopper for nice equal-depth sinks in series).
Lacking a drill press or rig, use at least two hands on the machine. No cowboy-style shooting.
An electric screwdriver like the one you are using according to the below comment, is a rather bad choice, too. It can make holes, somehow, but it's not really suited for the task.

There's people who recommend pressing very, very gently, and going in very slowly (with a moderate to high drill speed), too. I'm not a big fan of that, although it "works" for the problem. You however create a lot of friction by rubbing and scrubbing slowly, which needlessly wears down the tool and may leave burn marks. Unless the tool is blunt (and in that case, throw it away!) there is no reason to rub and scrub in slowly. It's a cutting tool intended for cutting.

10
  • I am pretty much limited to tools I can throw in a tool box at the moment; I have a work bench and a kitchen as my workspace :) Is a drill rig something like this? ebay.eu/1RPlECz I'd really like one, but I can't work out if you can just plug any old drill into them (I have a Black and Decker cordless) or if you have to get the specific drill they are designed for. Commented Dec 15, 2015 at 12:52
  • Yep. That, or something similar (I used something that looked just like that for years before getting a drill press). It doesn't seem like big deal, but it really helps a lot keeping the drill where you want it, not anywhere else. Both quality of holes and sinks are greatly improved.
    – Damon
    Commented Dec 15, 2015 at 12:55
  • Can any drill go in them? Commented Dec 15, 2015 at 12:59
  • As long as it fits into the clamp, sure. In Germany, this is a normative diameter, and clamps are 2-3mm larger. I assume it's just the same in UK (except they'll probably define the diameter by some inch measure, not in millimeters). I just looked and found my old drill rig in the garden shack... unluckily buried too deep under junk to get it out in finite time, or I'd have taken a photo.
    – Damon
    Commented Dec 15, 2015 at 13:12
  • This should probably be another question by now I guess, but my drill is the same as in this question (diy.stackexchange.com/questions/38628/…) - all areas of the body seem to have a taper - I just can't see where it would clamp? Commented Dec 15, 2015 at 13:20
4

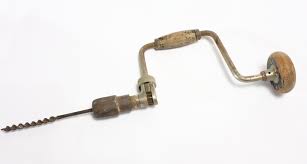
In wood I tend to get better results with a non-powered countersink tool, not even a wheel brace (the hand drill you mention in another comment). I can't find a suitably-licensed image online, but here's a picture of a dedicated tool. You can do the same by using your bit in a non-ratchet screwdriver handle. Don't push too hard. For small holes (up to say a 6mm screw) in softwood/chip/mdf etc. it's quick -- depending on the job, quicker than swapping bits all the time.

3
  • These are surprisingly good! Not as good as a "real" sinker in a drill of course, but as fallback solution when nothing better is available, they're great.
    – Damon
    Commented Dec 15, 2015 at 15:52
  • @Damon for steel I'd always use my drill press, but for wood (or aluminium up to ~M4) the hand tool is ideal. Manual effort seems to be too random to get the triangular/hexagonal holes caused by chatter (and of course it's too slow to resonate).
    – Chris H
    Commented Dec 15, 2015 at 16:14
  • Had to countersink a couple more holes last night and this tip worked well with the pre-painted board, although I had to go carefully to keep the countersink centered around the hole. Commented Dec 22, 2015 at 10:16
4

I believe your countersink has 5 flutes. If that's the case, then what's happening is the bit is wandering in a circular pattern, the drill is not being held steady enough, or has significant runout/wobble in the chuck or bit.

This process, when controlled and performed intentionally, can be used to drill square holes or any regular polygon by using a bit with one flute less than the number of sides of the polygon.

As you have discovered, this process doesn't always require control and intention. In your case it's happening because the bit isn't exactly centered on the existing hole in the wood, and is catching on one flute before the other flutes engage the wood. This results in moving the drill and drill bit the opposite direction, until another flute engages, and it proceeds in that fashion, creating the hexagon.

A few things may help, but ultimately it comes down to steadying the work and drill relative to each other. A drill press and vise or clamps should be sufficient, but without those tools you might have some success by:

  • Use a sharper countersink, which should cut rather than catch
  • Use a countersink with a pilot bit, which will make sure the countersink doesn't wobble once it engages the workpiece.
  • Use a higher speed, which again should cut rather than catch.
  • Clamp the work piece rather than hand holding.
  • Go very slowly, particularly when first engaging the work piece.
  • Don't rely on the bit to self center - make sure you are drilling in the exact center of the hole before the bit engages the wood.

A combination of these should resolve your problem.

Alternately, embrace the uniqueness of this technique, and make it an intentional part of the work.

2

The reason you are getting the best results before you predrill is because your countersink does not have a pilot bit of its own to keep it centered. It is relying on The point of the cone to hold it in the hole. the same problem would happen even if you had a pilot bit but the predrilled hole was much larger than the pilot (more than 1/16). Also I would guess that the material you are using is especially susceptible to this problem.

Solutions:

  1. Get a countersink bit with a pilot bit. They are quite normal, if not the standard you will find at a major hardware store. Use it to predrill and countersink all at once. You may then use a larger bit if you need the hole larger than the pilot. OR
  2. Instead of predrilling the hole, make a small indent with a nail (or a tool specifically for this which I cannot remember the name for), in order to hold the bit you have in the right position. Sharp bit matters as well. Then drill out the hole.

You should be able to do either with a hand power drill. I work almost exclusively with cordless battery power drills and impacts and have no issues. Also the more I've thought of it, material being used really affects how the speed and pressure I would use.

A hard wood will offer more resistance and will not do what you have seen so easily. Bring the drill up to speed and then apply pressure.

A soft material, which I believe you were using in the photo, will easily drill poorly. If using #2 then go slowly. This is why I suggest #1 first for it will more consistently and quickly result in a good product.

1

I agree with Damon, that has to do with chatter, the drill is actually moving up and down to allow such a thing to happen. Now why? Two things come to mind. The first is much less likely but I thought I'd point it out, I've seen a least one bit that you ran the drill 'backwards' for the countersink to cut correctly.

This will cause the same issue as the other one. If it is really dull countersink it will chatter no matter how strong you are. (a backwards one is using the dull side so works the same). So I would recommend either sharpening it or getting a new one.

I just did a little search and counter sinks, and I think I need to invest a little on some of the nice one that will drill my hole and counter sink in one go! Anyway you can get them really cheap or pay some decent money for them.

Edt: after seeing you have an electric 'screwdriver' not a drill, I would say this is allowing the chatter. Those really are not designed well for this type of application. You don't need a cordless drill to do this, allowing for a much cheaper corded drill to be added to your tool set.

As another note, a hand drill with a large sharp bit could be used to round them out after you have them close, which might be cheaper yet.

enter image description here enter image description here

1
  • "after seeing you have an electric 'screwdriver' not a drill, I would say this is allowing the chatter" - I actually used a hand-drill (one of those withe the side wheel) for this hole, due to sleeping toddler. I didn't think of using a large drill bit in it, that's a great idea. Commented Dec 15, 2015 at 14:40
1

I believe the reason for a non round countersink is the number of flutes/blades on the bit. With an odd number, if you can imagine it, a blade on one side is cutting whilst there is no cutting blade on the opposite side and therefore no even support for the bit. This will cause the bit to wander according to the amount of support it is receiving. I experimented with a new, sharp 5 fluted bit in a piece of scrap pine pre drilled and it produced a hexagonal hole. I also used a new, sharp 6 fluted bit and it produced a perfectly smooth round hole. I used a hand held drill and the speed or pressure made no difference. My opinion is that some bits (odd or even fluted) are better suited for use in a drill press or lathe where everything is clamped in position and some (even fluted only) are suited to hand drilling where things are allowed to move.

Your Answer

By clicking “Post Your Answer”, you agree to our terms of service and acknowledge you have read our privacy policy.

Not the answer you're looking for? Browse other questions tagged or ask your own question.