22

I'm using a table saw to make picture frames with mitered corners. It turns out that even tiny inaccuracies in the miter angle or the lengths of the frame pieces cause gaps that make a frame look sloppy. I know there are ways to fine tune a miter joint, like using a plane and a shooting board to trim the pieces. And there are specialty tools like a Lion Trimmer. But we're talking about fairly simple geometry here, so I feel like there must be some technique behind perfect, repeatable miter joints.

How can I create perfect miter joints every time without needing to measure each one veerrry carefully?

5
  • 1
    I doubt this is an answer will stand on its own but are you using a mitre saw? Have you measure with a square that your blade is true? I did recently and found I was out by almost a degree. Had the same issue when I was making my frames
    – Matt
    Commented May 14, 2015 at 20:08
  • 1
    @Matt I agree about making sure tools are properly adjusted, that's a great point. But I mean to ask here specifically about table saw techniques.
    – Caleb
    Commented May 14, 2015 at 20:13
  • 2
    Yeah.... I missed the part about table saws. Sorry about that. The sled is a great answer.
    – Matt
    Commented May 14, 2015 at 20:19
  • 3
    It may seem counterintuitive, but measuring is often the enemy of precision in the shop. Parallax and even the thickness of a line on a scale will challenge your ability to set up equal-length or perfectly-mated cuts. Use stop blocks, and gauge against known reference surfaces.
    – rob
    Commented May 14, 2015 at 22:24
  • @rob Although certainly related, repeatability and precision aren't synonymous. An operation can be precise without being (easily) repeatable, or repeatable without being very precise. Maybe a question for meta.
    – Caleb
    Commented May 15, 2015 at 13:42

3 Answers 3

22

There's two ways that immediately pop to mind- one involves spending a significant amount of money, the other a significant amount of time.

You can buy replacement miter gauges for most table saws (e.g. Incra) that are very very accurate. Couple that with a good tune-up, and you'll be cutting perfect miters in no time.

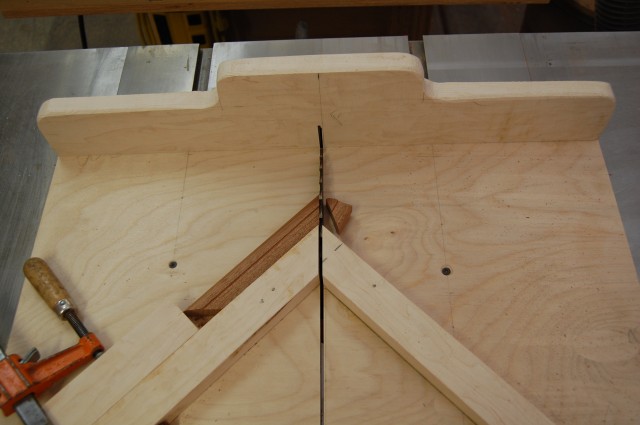
However, the other option is to make a nice miter sled.

miter sled

Both options will provide a nice stop block system, which will give you exact, repeatable lengths. Couple that with accurate angle measurements, and you're really good to go.

2
  • 1
    The slick thing about a miter sled is that the only measurement that matters is the "finished" angle. It works regardless of the two sides are exactly 45 degrees. As long as they add up to 90 (or whatever angle you're shooting for) it doesn't matter if one is slightly more acute and the other is slightly more obtuse.
    – rob
    Commented May 14, 2015 at 22:29
  • 5
    @rob, that's true if a 90 degree angle is all you care about. But with a 90 degree angle that isn't perfectly bisected, the faces of the miter won't be the same length. You could just reduce the width of one of the pieces and it might work out though!
    – lars
    Commented May 15, 2015 at 3:28
12

The miter sled and precision miter gauge suggested by TX Turner work great for picture frames since your table saw's maximum depth of cut does not become a limiting factor.

To make mitered boxes--including shadow boxes with mitered corners--there is another technique that works well, which involves tilting your saw blade and using a crosscut sled.

If you have a digital angle gauge, you can use that to set your table saw's tilt angle. Otherwise, you can use a drafter's square, use the 45 degree angle on your combination square, or set your bevel gauge to exactly 45 degrees (or other appropriate angle) to accurately gauge your table saw's angle as you tilt the blade. Be sure to register against the table saw top and the plate of the saw blade (not the teeth). To make sure the blade is perfectly flush with your gauge, add backlighting behind the gauge and adjust the blade tilt angle until no light passes between the gauge and blade.

Note that you may want to use a separate sled for 90 degree crosscuts vs. angled cuts, since the zero-clearance kerf won't match up. On many saws, the blade is not centered between the miter slots, so depending on your saw you may be able to rotate your existing crosscut sled 180 degrees and cut an angled kerf without interfering with the 90 degree kerf. If you do run the sled backwards, make sure to add any appropriate safety features to the other end, as well.
1

You use a sled. What also matters is if your saw has any wiggle. If you use a sled you can add stops so you get repeatability.

Your Answer

By clicking “Post Your Answer”, you agree to our terms of service and acknowledge you have read our privacy policy.

Not the answer you're looking for? Browse other questions tagged or ask your own question.