5

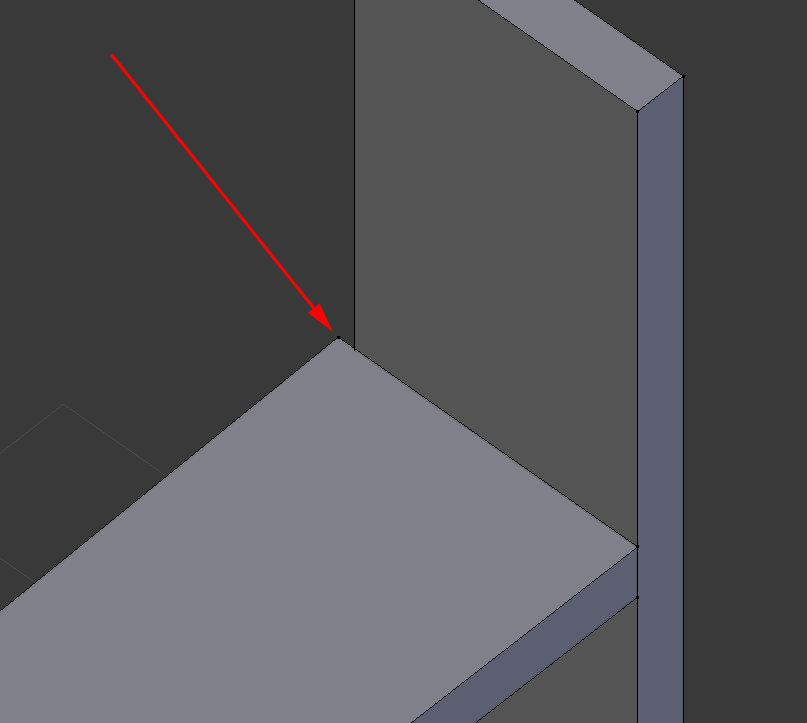
Is there a method or technique for tapering a board with a handheld power planer? I have an assembly that's got one board butted up against another board at each end, kind of in an "H" configuration. The cross piece of the H is 1/16-1/8" proud at one end, but flush at the other.

enter image description here

(Sketch courtesy of Damon)

Without disassembling the whole thing, I'd like to plane it flush. However, powered planers generally only have two parallel shoes, not one that can be angled up or down. How can I achieve a smooth taper?

Or is there a better tool for this job that's relatively inexpensive?

The project that generated this question is a king bed frame constructed of raw 2x6 boards lagged together. I'm planning on adding stained "finish boards" screwed in from the back when I get the chance.

8
  • Cheaper solution than the finish boards might be veneer, though you'd have to do both front and back of the board to prevent cupping. (Back can be a cheaper veneer, though.)
    – keshlam
    Commented Jul 15, 2015 at 17:16
  • 2
    A picture or diagram would help clarify what exactly you're up against here. I tried to answer your question based on how I interpreted it, but please let me know if I misunderstood.
    – grfrazee
    Commented Jul 15, 2015 at 17:45
  • Do I understand your issue correct? ---> i.imgur.com/RHtqbmh.png
    – Damon
    Commented Jul 16, 2015 at 10:59
  • @damon, yes - that's exactly what I'm trying to do. Sorry, hadn't had time to add a diagram myself.
    – Doresoom
    Commented Jul 16, 2015 at 11:31
  • 2
    Note: when doing this kind of tapering, use a straight-edge and pencil to mark the line you want to taper to. This provides guidance for where, and how much, you still need to remove. (I'm trying, and failing, not to ask how you got into this situation in the first place.)
    – keshlam
    Commented Jul 16, 2015 at 14:59

2 Answers 2

5

Having never used a handheld planer for this I think you can do this the same way you'd do it with a hand plane, if it can be adjusted to take a light enough cut.

You're simply planing the board more towards one end, in stages:

  • plane first from about 3/4 of the way along the board
  • next couple of passes from about halfway along the board
  • last passes to get the edge nearly flush over approx. the last quarter of the board
  • one or two very very light final passes along nearly the whole length to flatten out

I do a lot of tapering by hand this way on a small scale and the process does translate to longer surfaces such as board edges, although it's more difficult when working larger to get a flat edge after you're done.

Which direction you plane the board to prevent tearout is an additional uncertainty. Most wood has a preferred planing direction, and if on your board edge that's away from the lip then you'll have to work opposite to the above outlined method, planing towards the 3/4 mark, then the halfway point etc. This will involve lifting the planer away from the wood as it runs, and I don't know how easy or safe that is.

In either case I think you should protect the edge of the wood at 90° to the board you're planing with a couple of layers of tape.

Once the uppermost layer of tape is getting chewed by the planer then it's time to stop planing and switch to something else. I would take the last of it off with a file, then do finish scraping or sanding, but you could of course skip the file and do all the work with sandpaper, it'll just take longer. In case it needs to be said: back the paper with a block.

Or is there a better tool for this job that's relatively inexpensive?

I'm presuming here that you don't have a belt sander, which is the tool I would use for this if I didn't own a hand plane.

If you wanted to buy something specifically for this I'd get a low-angle block plane. One of these has a lot of potential future utility, so it's a very worthwhile investment (lifetime tool too, won't ever wear out and has no consumables like a sander). But, unless you buy high end you will need to sharpen it for it to work successfully first time.
2
  • The increment resolution on my planer is 1/256" (0.1mm), so I certainly hope taking a light enough cut wouldn't be an issue! I figured a belt sander would be the best option, but I don't have one (yet), and was trying to make do with the tools I had on hand.
    – Doresoom
    Commented Jul 16, 2015 at 13:56
  • @Doresoom, yeah I think 0.1mm would do it! 1/256" translates to a shaving thickness of 4 thousands, not quite as thin as you can hand plane but well within the acceptable range.
    – Graphus
    Commented Jul 16, 2015 at 15:41
4

If I understand your issue correctly, there are a few ways to tackle your misalignment. Since the internet loves lists, I've edited my post to do so:

  • If I were doing it, I would use a smoothing (hand) plane to take off your high spot on the cross-piece of the H. A couple swipes with the plane, followed by a bit of sanding and/or scraping, and the joint should be nice and flat.

  • Use a nice, sharp chisel and skim the high spot off with light passes. Move the chisel in kind of a circular motion so that it's more of a shear cut instead of cutting into end grain or cross grain. This will lead to a smoother result. You'll want to use the lower piece as a platform to index your chisel against. Again, follow up with sand paper and/or scraping.

  • Use a belt sander to very quickly flatten the high spot. You indicated that this face will have a veneer of sorts over it, so having rough sanding marks may not matter since they will be covered.

  • Fill in the low spot with putty (like Bondo) or with a glued-in shim.

  • Trim off the high spot with a flush-cut saw, indexing the broad face of the saw against the low spot

Your Answer

By clicking “Post Your Answer”, you agree to our terms of service and acknowledge you have read our privacy policy.

Not the answer you're looking for? Browse other questions tagged or ask your own question.