Commonmark migration
Source Link

So after continuing to struggle with this, I found some good advice in a forum thread on the topic in this great post by user Steve Schoene:

On 05-19-2007 Steve Schoene writes:


The problem often is trying to think of shellac as if it were varnish. It's easy to apply, but requires a different technique and mind set. With varnish you flow it on, and even it out--the process is one of smooth and easy.


With shellac, unless you spray, you can't just put on an even spread, you have to make shellac's particular characteristics--quick drying and complete fusing between "coats", and fairly easy sanding work for you, not against.


First don't try too heavy a coating with 1 1/2 to 2 lb. "cut" being the most user friendly. You can use a pad, which is made with a fine weave fabric such as white cotton percale sheeting, wrapped around a bundle of anything absorbant. The pad should be about egg size and have no wrinkles on the surface. (This is similar to French polishing pads, but no oil is needed, nor any particular skill.) You just apply shellac with the pad, working quickly and never going back over an area to fix a missed spot or overlap. You want to apply thin and fairly even coats, but don't obsess over it. Just fully damp, not flowing coats.


You can build a finish a little faster with a brush. I strongly prefer watercolor wash brushes (about 1 1/2" wide is enough for anything). The best bristles are Golden Taklon which are very fine and leave zero brush strokes. The brush doesn't hold a lot, so you never get really heavy coats. Again, you work very quickly, ignoring misses or overlaps. Just try not to miss the same place or overlap in the same place on subsequent coats. These little misses and laps will even out in the end.


You can apply a number of coats 3 or 4 for example, and then let it dry more thoroughly and lightly sand to level out the surface. Then apply a few more "coats" and level again with sand paper as you need to. (You do not need to sand between coats for adhesion, only to level out problems.)


Never let either pad or brush drag. If you notice any dragginess STOP immediately and let the surface dry more thoroughly before proceeding with another coat. If you ignore this you risk getting a "rumpled" mess. (It will sand out after drying overnight, but it's not pleasant.)


When you have built to the thickness you desire, you can level with a fairly fine grit 600 and then 1000 or 1200 and proceed to either pumice (for satin sheen) or to rottenstone (for gloss). Rubbing compounds also work well. You should give at least several days or a week before rubbing out--not nearly the month you should wait before rubbing out varnish.

In particular, the tip I learned the most from there is to never go back and fix missed spots; just let the next coat cover them, taking advantage of shellac's good fusing of coats. It also hits on some of the things mentioned in both the other answers currently here (the uniqueness of shellac and the use of pads).

Following the advice in the post above left me with a much nicer finish on the last piece I put shellac on.

Also, of some use here, here is a nice table of dilution ratios for diluting premixed shellac:
enter image description here

So after continuing to struggle with this, I found some good advice in a forum thread on the topic in this great post by user Steve Schoene:

On 05-19-2007 Steve Schoene writes:

The problem often is trying to think of shellac as if it were varnish. It's easy to apply, but requires a different technique and mind set. With varnish you flow it on, and even it out--the process is one of smooth and easy.

With shellac, unless you spray, you can't just put on an even spread, you have to make shellac's particular characteristics--quick drying and complete fusing between "coats", and fairly easy sanding work for you, not against.

First don't try too heavy a coating with 1 1/2 to 2 lb. "cut" being the most user friendly. You can use a pad, which is made with a fine weave fabric such as white cotton percale sheeting, wrapped around a bundle of anything absorbant. The pad should be about egg size and have no wrinkles on the surface. (This is similar to French polishing pads, but no oil is needed, nor any particular skill.) You just apply shellac with the pad, working quickly and never going back over an area to fix a missed spot or overlap. You want to apply thin and fairly even coats, but don't obsess over it. Just fully damp, not flowing coats.

You can build a finish a little faster with a brush. I strongly prefer watercolor wash brushes (about 1 1/2" wide is enough for anything). The best bristles are Golden Taklon which are very fine and leave zero brush strokes. The brush doesn't hold a lot, so you never get really heavy coats. Again, you work very quickly, ignoring misses or overlaps. Just try not to miss the same place or overlap in the same place on subsequent coats. These little misses and laps will even out in the end.

You can apply a number of coats 3 or 4 for example, and then let it dry more thoroughly and lightly sand to level out the surface. Then apply a few more "coats" and level again with sand paper as you need to. (You do not need to sand between coats for adhesion, only to level out problems.)

Never let either pad or brush drag. If you notice any dragginess STOP immediately and let the surface dry more thoroughly before proceeding with another coat. If you ignore this you risk getting a "rumpled" mess. (It will sand out after drying overnight, but it's not pleasant.)

When you have built to the thickness you desire, you can level with a fairly fine grit 600 and then 1000 or 1200 and proceed to either pumice (for satin sheen) or to rottenstone (for gloss). Rubbing compounds also work well. You should give at least several days or a week before rubbing out--not nearly the month you should wait before rubbing out varnish.

In particular, the tip I learned the most from there is to never go back and fix missed spots; just let the next coat cover them, taking advantage of shellac's good fusing of coats. It also hits on some of the things mentioned in both the other answers currently here (the uniqueness of shellac and the use of pads).

Following the advice in the post above left me with a much nicer finish on the last piece I put shellac on.

Also, of some use here, here is a nice table of dilution ratios for diluting premixed shellac:

enter image description here

replaced http://woodworking.stackexchange.com/ with https://woodworking.stackexchange.com/
Source Link

So after continuing to struggle with this, I found some good advice in a forum thread on the topic in this great post by user Steve Schoene:

On 05-19-2007 Steve Schoene writes:

The problem often is trying to think of shellac as if it were varnish. It's easy to apply, but requires a different technique and mind set. With varnish you flow it on, and even it out--the process is one of smooth and easy.

With shellac, unless you spray, you can't just put on an even spread, you have to make shellac's particular characteristics--quick drying and complete fusing between "coats", and fairly easy sanding work for you, not against.

First don't try too heavy a coating with 1 1/2 to 2 lb. "cut" being the most user friendly. You can use a pad, which is made with a fine weave fabric such as white cotton percale sheeting, wrapped around a bundle of anything absorbant. The pad should be about egg size and have no wrinkles on the surface. (This is similar to French polishing pads, but no oil is needed, nor any particular skill.) You just apply shellac with the pad, working quickly and never going back over an area to fix a missed spot or overlap. You want to apply thin and fairly even coats, but don't obsess over it. Just fully damp, not flowing coats.

You can build a finish a little faster with a brush. I strongly prefer watercolor wash brushes (about 1 1/2" wide is enough for anything). The best bristles are Golden Taklon which are very fine and leave zero brush strokes. The brush doesn't hold a lot, so you never get really heavy coats. Again, you work very quickly, ignoring misses or overlaps. Just try not to miss the same place or overlap in the same place on subsequent coats. These little misses and laps will even out in the end.

You can apply a number of coats 3 or 4 for example, and then let it dry more thoroughly and lightly sand to level out the surface. Then apply a few more "coats" and level again with sand paper as you need to. (You do not need to sand between coats for adhesion, only to level out problems.)

Never let either pad or brush drag. If you notice any dragginess STOP immediately and let the surface dry more thoroughly before proceeding with another coat. If you ignore this you risk getting a "rumpled" mess. (It will sand out after drying overnight, but it's not pleasant.)

When you have built to the thickness you desire, you can level with a fairly fine grit 600 and then 1000 or 1200 and proceed to either pumice (for satin sheen) or to rottenstone (for gloss). Rubbing compounds also work well. You should give at least several days or a week before rubbing out--not nearly the month you should wait before rubbing out varnish.

In particular, the tip I learned the most from there is to never go back and fix missed spots; just let the next coat cover them, taking advantage of shellac's good fusing of coats. It also hits on some of the things mentioned in both the other answers currently here (the uniqueness of shellacuniqueness of shellac and the use of padsuse of pads).

Following the advice in the post above left me with a much nicer finish on the last piece I put shellac on.

Also, of some use here, here is a nice table of dilution ratios for diluting premixed shellac:

enter image description here

So after continuing to struggle with this, I found some good advice in a forum thread on the topic in this great post by user Steve Schoene:

On 05-19-2007 Steve Schoene writes:

The problem often is trying to think of shellac as if it were varnish. It's easy to apply, but requires a different technique and mind set. With varnish you flow it on, and even it out--the process is one of smooth and easy.

With shellac, unless you spray, you can't just put on an even spread, you have to make shellac's particular characteristics--quick drying and complete fusing between "coats", and fairly easy sanding work for you, not against.

First don't try too heavy a coating with 1 1/2 to 2 lb. "cut" being the most user friendly. You can use a pad, which is made with a fine weave fabric such as white cotton percale sheeting, wrapped around a bundle of anything absorbant. The pad should be about egg size and have no wrinkles on the surface. (This is similar to French polishing pads, but no oil is needed, nor any particular skill.) You just apply shellac with the pad, working quickly and never going back over an area to fix a missed spot or overlap. You want to apply thin and fairly even coats, but don't obsess over it. Just fully damp, not flowing coats.

You can build a finish a little faster with a brush. I strongly prefer watercolor wash brushes (about 1 1/2" wide is enough for anything). The best bristles are Golden Taklon which are very fine and leave zero brush strokes. The brush doesn't hold a lot, so you never get really heavy coats. Again, you work very quickly, ignoring misses or overlaps. Just try not to miss the same place or overlap in the same place on subsequent coats. These little misses and laps will even out in the end.

You can apply a number of coats 3 or 4 for example, and then let it dry more thoroughly and lightly sand to level out the surface. Then apply a few more "coats" and level again with sand paper as you need to. (You do not need to sand between coats for adhesion, only to level out problems.)

Never let either pad or brush drag. If you notice any dragginess STOP immediately and let the surface dry more thoroughly before proceeding with another coat. If you ignore this you risk getting a "rumpled" mess. (It will sand out after drying overnight, but it's not pleasant.)

When you have built to the thickness you desire, you can level with a fairly fine grit 600 and then 1000 or 1200 and proceed to either pumice (for satin sheen) or to rottenstone (for gloss). Rubbing compounds also work well. You should give at least several days or a week before rubbing out--not nearly the month you should wait before rubbing out varnish.

In particular, the tip I learned the most from there is to never go back and fix missed spots; just let the next coat cover them, taking advantage of shellac's good fusing of coats. It also hits on some of the things mentioned in both the other answers currently here (the uniqueness of shellac and the use of pads).

Following the advice in the post above left me with a much nicer finish on the last piece I put shellac on.

Also, of some use here, here is a nice table of dilution ratios for diluting premixed shellac:

enter image description here

added 261 characters in body
Source Link
Jason C
  • 5.6k
  • 14
  • 48
  • 90

So after continuing to struggle with this, I found some good advice in a forum thread on the topic in this great post by user Steve Schoene:

On 05-19-2007 Steve Schoene writes:

The problem often is trying to think of shellac as if it were varnish. It's easy to apply, but requires a different technique and mind set. With varnish you flow it on, and even it out--the process is one of smooth and easy.

With shellac, unless you spray, you can't just put on an even spread, you have to make shellac's particular characteristics--quick drying and complete fusing between "coats", and fairly easy sanding work for you, not against.

First don't try too heavy a coating with 1 1/2 to 2 lb. "cut" being the most user friendly. You can use a pad, which is made with a fine weave fabric such as white cotton percale sheeting, wrapped around a bundle of anything absorbant. The pad should be about egg size and have no wrinkles on the surface. (This is similar to French polishing pads, but no oil is needed, nor any particular skill.) You just apply shellac with the pad, working quickly and never going back over an area to fix a missed spot or overlap. You want to apply thin and fairly even coats, but don't obsess over it. Just fully damp, not flowing coats.

You can build a finish a little faster with a brush. I strongly prefer watercolor wash brushes (about 1 1/2" wide is enough for anything). The best bristles are Golden Taklon which are very fine and leave zero brush strokes. The brush doesn't hold a lot, so you never get really heavy coats. Again, you work very quickly, ignoring misses or overlaps. Just try not to miss the same place or overlap in the same place on subsequent coats. These little misses and laps will even out in the end.

You can apply a number of coats 3 or 4 for example, and then let it dry more thoroughly and lightly sand to level out the surface. Then apply a few more "coats" and level again with sand paper as you need to. (You do not need to sand between coats for adhesion, only to level out problems.)

Never let either pad or brush drag. If you notice any dragginess STOP immediately and let the surface dry more thoroughly before proceeding with another coat. If you ignore this you risk getting a "rumpled" mess. (It will sand out after drying overnight, but it's not pleasant.)

When you have built to the thickness you desire, you can level with a fairly fine grit 600 and then 1000 or 1200 and proceed to either pumice (for satin sheen) or to rottenstone (for gloss). Rubbing compounds also work well. You should give at least several days or a week before rubbing out--not nearly the month you should wait before rubbing out varnish.

In particular, the tip I learned the most from there is to never go back and fix missed spots; just let the next coat cover them, taking advantage of shellac's good fusing of coats. It also hits on some of the things mentioned in both the other answers currently here (the uniqueness of shellac and the use of pads).

Following the advice in the post above left me with a much nicer finish on the last piece I put shellac on.

Also, of some use here, here is a nice table of dilution ratios for diluting premixed shellac:

enter image description here

So after continuing to struggle with this, I found some good advice in a forum thread on the topic in this great post by user Steve Schoene:

On 05-19-2007 Steve Schoene writes:

The problem often is trying to think of shellac as if it were varnish. It's easy to apply, but requires a different technique and mind set. With varnish you flow it on, and even it out--the process is one of smooth and easy.

With shellac, unless you spray, you can't just put on an even spread, you have to make shellac's particular characteristics--quick drying and complete fusing between "coats", and fairly easy sanding work for you, not against.

First don't try too heavy a coating with 1 1/2 to 2 lb. "cut" being the most user friendly. You can use a pad, which is made with a fine weave fabric such as white cotton percale sheeting, wrapped around a bundle of anything absorbant. The pad should be about egg size and have no wrinkles on the surface. (This is similar to French polishing pads, but no oil is needed, nor any particular skill.) You just apply shellac with the pad, working quickly and never going back over an area to fix a missed spot or overlap. You want to apply thin and fairly even coats, but don't obsess over it. Just fully damp, not flowing coats.

You can build a finish a little faster with a brush. I strongly prefer watercolor wash brushes (about 1 1/2" wide is enough for anything). The best bristles are Golden Taklon which are very fine and leave zero brush strokes. The brush doesn't hold a lot, so you never get really heavy coats. Again, you work very quickly, ignoring misses or overlaps. Just try not to miss the same place or overlap in the same place on subsequent coats. These little misses and laps will even out in the end.

You can apply a number of coats 3 or 4 for example, and then let it dry more thoroughly and lightly sand to level out the surface. Then apply a few more "coats" and level again with sand paper as you need to. (You do not need to sand between coats for adhesion, only to level out problems.)

Never let either pad or brush drag. If you notice any dragginess STOP immediately and let the surface dry more thoroughly before proceeding with another coat. If you ignore this you risk getting a "rumpled" mess. (It will sand out after drying overnight, but it's not pleasant.)

When you have built to the thickness you desire, you can level with a fairly fine grit 600 and then 1000 or 1200 and proceed to either pumice (for satin sheen) or to rottenstone (for gloss). Rubbing compounds also work well. You should give at least several days or a week before rubbing out--not nearly the month you should wait before rubbing out varnish.

In particular, the tip I learned the most from there is to never go back and fix missed spots; just let the next coat cover them, taking advantage of shellac's good fusing of coats.

Following the advice in the post above left me with a much nicer finish on the last piece I put shellac on.

So after continuing to struggle with this, I found some good advice in a forum thread on the topic in this great post by user Steve Schoene:

On 05-19-2007 Steve Schoene writes:

The problem often is trying to think of shellac as if it were varnish. It's easy to apply, but requires a different technique and mind set. With varnish you flow it on, and even it out--the process is one of smooth and easy.

With shellac, unless you spray, you can't just put on an even spread, you have to make shellac's particular characteristics--quick drying and complete fusing between "coats", and fairly easy sanding work for you, not against.

First don't try too heavy a coating with 1 1/2 to 2 lb. "cut" being the most user friendly. You can use a pad, which is made with a fine weave fabric such as white cotton percale sheeting, wrapped around a bundle of anything absorbant. The pad should be about egg size and have no wrinkles on the surface. (This is similar to French polishing pads, but no oil is needed, nor any particular skill.) You just apply shellac with the pad, working quickly and never going back over an area to fix a missed spot or overlap. You want to apply thin and fairly even coats, but don't obsess over it. Just fully damp, not flowing coats.

You can build a finish a little faster with a brush. I strongly prefer watercolor wash brushes (about 1 1/2" wide is enough for anything). The best bristles are Golden Taklon which are very fine and leave zero brush strokes. The brush doesn't hold a lot, so you never get really heavy coats. Again, you work very quickly, ignoring misses or overlaps. Just try not to miss the same place or overlap in the same place on subsequent coats. These little misses and laps will even out in the end.

You can apply a number of coats 3 or 4 for example, and then let it dry more thoroughly and lightly sand to level out the surface. Then apply a few more "coats" and level again with sand paper as you need to. (You do not need to sand between coats for adhesion, only to level out problems.)

Never let either pad or brush drag. If you notice any dragginess STOP immediately and let the surface dry more thoroughly before proceeding with another coat. If you ignore this you risk getting a "rumpled" mess. (It will sand out after drying overnight, but it's not pleasant.)

When you have built to the thickness you desire, you can level with a fairly fine grit 600 and then 1000 or 1200 and proceed to either pumice (for satin sheen) or to rottenstone (for gloss). Rubbing compounds also work well. You should give at least several days or a week before rubbing out--not nearly the month you should wait before rubbing out varnish.

In particular, the tip I learned the most from there is to never go back and fix missed spots; just let the next coat cover them, taking advantage of shellac's good fusing of coats. It also hits on some of the things mentioned in both the other answers currently here (the uniqueness of shellac and the use of pads).

Following the advice in the post above left me with a much nicer finish on the last piece I put shellac on.

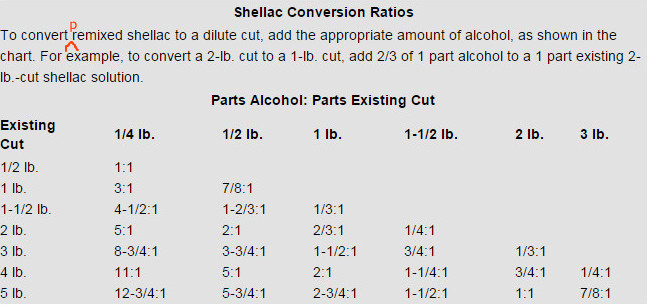
Also, of some use here, here is a nice table of dilution ratios for diluting premixed shellac:

enter image description here

Source Link
Jason C
  • 5.6k
  • 14
  • 48
  • 90
Loading
Post Made Community Wiki by Jason C