14

I am planning my first cabinetry project, and having difficulty with some of the shapes in my design. I would like to have notches along the edge of some large boards. There are two types of notches:

  1. At the bottom of a board for the sides of the cabinet, the corner is cut in for a recessed kick plate. This seems common, and is clearly used in my kitchen and bathroom cabinets. I don't understand how to get a precise cut that meets in an interior angle.

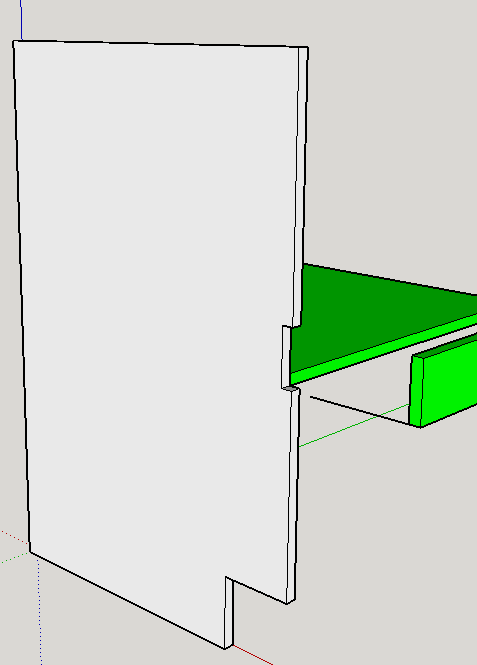
  2. Along the front, wide but relatively shallow notches. This will allow a board running horizontally to be recessed flush with the edge of the board, as a front for a shelf (in green). I would like this board to span multiple compartments and not simply butt up to the side of the vertical board. I haven't observed this in other designs, but seems reasonable yet presents similar problems to #1.

Illustration of notch cuts

Are there names for these types of cuts? How can I accomplish them precisely?

I have used my jigsaw or chisel for similar cuts on other projects. While I wasn't aiming for high precision on those projects, it seems too sloppy to achieve the precision for cabinetry.

I have just purchased a good table saw and router, and am a complete novice with them. I have thought about standing the board on edge and cutting in to get a clean cut, using a dado or many passes for the edge notch, but that seems awkward and quite dangerous. This does seem plausible with a sled jig assuming the blade can cut deep enough, but I don't have any experience and making one seems like a significant task itself!

Using the router might help, but would leave a radius on the inside edge that I don't want.

If this is simply a bad design, what are better ways to accomplish the intent?

3 Answers 3

13

I presume it's obvious but I'll say it anyway, accurate layout and marking on the wood is an all-important first step.

I have used my jigsaw or chisel for similar cuts on other projects. While I wasn't aiming for high precision on those projects, it seems too sloppy to achieve the precision for cabinetry.

I wouldn't myself do these kinds of cuts using a jigsaw, but it is possible though. People successfully use jigsaws to cut deep overlapping cross-lap joints for knockdown plywood furniture and that requires quite a high degree of accuracy.

Jigsaw
Some of the tips given for doing clean, straight cuts with a jigsaw are:

  • run the baseplate along a straight edge clamped in place (just a good straight piece of 1x2 is all that's needed)
  • work slowly, if you force the cut it can tend to induce flex in the blade
  • use a good quality blade (some are also capable of giving good surfaces on both sides of the material, although many are designed to give good top or bottom surfaces)
  • if you can't find or afford a suitable blade it's worth deeply knifing your layout lines on both sides to prevent chipout

Hand tools
I would do these sorts of cuts by hand and a sharp chisel would play a big part in the process, especially for cleaning up the corners but often for a bit of fine-tuning of the straight cuts, paring back to my gauged lines.

If one of the difficulties you experienced when paring with a chisel was holding it consistently vertical it's worth using a guide block clamped in place that the flat of the chisel can ride against:
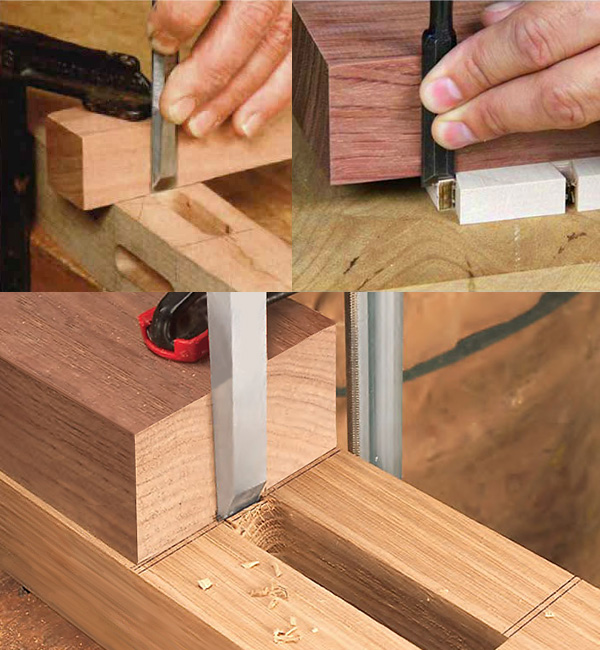
Chisel guide blocks

Guide blocks can also be used to help ensure square shoulders when sawing as shown in this pair of illustrations which I think originally came from a Jackson/Day book:
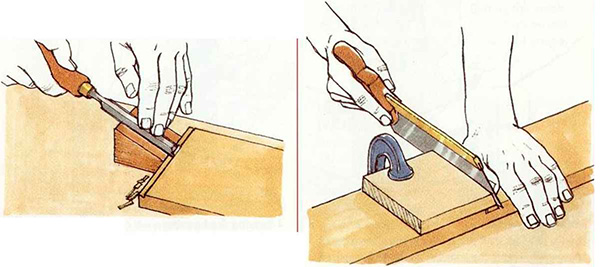
Guide block for paring and sawing

I have just purchased a good table saw and router, and am a complete novice with them. I have thought about standing the board on edge and cutting in to get a clean cut, using a dado or many passes for the edge notch, but that seems awkward and quite dangerous.

Yes that could be quite dangerous with a table saw!

Router
A router can be used quite easily to do these sorts of cut-outs. A jig or template would make the cuts very accurate and repeatable, if you don't mind having to construct them ahead of time. The jigs would be much like those in the following pic, made for doing the recess to take a hinge:
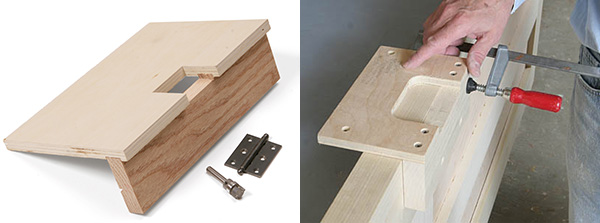
Router hinge templates

The cut-out in the template is made a little oversize (by a fixed amount so easy to make the necessary adjustments to your measurements) and a collar/guide bush projecting from the base of the router will follow along its inside edge.

If you're cutting through the full thickness of the material in one pass turn the speed on the router up to full and progress the cut at a measured pace, do not attempt to force it to cut.

Rounded corners: a router will naturally produce rounded internal corners, which are usually squared up. This is commonly done with a chisel, but you can also use a corner chisel or the 'shell' of a mortising bit.

If you don't fancy doing that you can actually leave the corners round. For the toe-kick especially I don't see an advantage to making the corner square and having it rounded is less usual so you could consider it a feature.

With the front notch that will accept the horizontal board you would have to round over a short portion of the two inside edges of the board to get it to fit in the notch properly. This isn't particularly difficult, although you may want to practice once or twice on scraps before doing it for real. Again after carefully marking out to start with you can do this by paring (using a chisel, carving knife, sharp penknife), paring then sanding, just by sanding or with a file, whatever you prefer.
4
  • 1
    Thanks! These all seem like good options. I hadn't considered using a straight edge with my jigsaw. It seems like I should be able to do that, being careful not to cut to far, and then use the chisel to clean up the corners.
    – mbmcavoy
    Commented Jul 12, 2016 at 15:48
  • The hand router can be taken through the other way set at the correct depth. That will give you the square corners. With a correct template setup of course.
    – Joshua
    Commented Jul 18, 2016 at 22:17
  • I finally got to this point in my project, and have successfully made several of these cuts, trying various methods. Using the router worked well, but going through 3/4 plywood was a bit much. Using a guide on the jigsaw was a little rougher than I'd like. In the end I found that cutting most of the wood away with the jigsaw and then finishing with a chisel was great!
    – mbmcavoy
    Commented Jul 30, 2016 at 2:11
  • @mbmcavoy, thanks for the update, we regularly don't get those! Glad using a chisel turned out to be a good technique to complete this, especially in light of the advice not to use chisels in another Answer :-)
    – Graphus
    Commented Jul 30, 2016 at 7:24
3

You can chisel out the rounded inside edge after you route the shallow notch. Or you can route from the edge rather than the front. Stand the board on edge and then use a straight bit from the top. You can clamp it down against your workbench with some sacrificial scrap.

The cut in the bottom can be done using a table saw up until the front of the blade reaches the corner at the bottom. Then you finish off with a handsaw.

2

When a shallow cut is being made, sometimes a table saw can be used, but here it cannot because you would have to stand the board on end and it would be unmanageable.

For the corner cut, use a power jigsaw with a right angle guide. Drill a hole where the corner of the cutout should be. Then use the jigsaw to cut a straight line to the edge of the hole on both sides. To square it out, use a small rasp and then a bastard file. Use a sanding block as the final step. Clamp two perfectly straight boards on either side of the edge being rasped. This will prevent you from rounding off the edges and ensure that they are nice and sharp.

To make the cutout on the side do the same thing, except drill two holes, one for each corner.

(I would advise avoiding chisels. Using chisels effectively requires a lot of experience and training. They are not appropriate tools for novice woodworkers.)

3
  • 1
    While I'm a big fan of rasps and files the quality of rasp you'd want to use here is a $$ item, just one would cost more than an entire set of starter chisels and all the sharpening gear necessary to sharpen them as well. As for chisels not being an appropriate tool for novices, every woodworking guide for beginners (including schoolchildren) I have going back to the 19th century the chisel is part of the starter kit.
    – Graphus
    Commented Jul 19, 2016 at 10:04
  • @Graphus Entire books have been written on sharpening chisels. It's not something I recommend for novices. Also, using a chisel correctly is a lot more difficult than using rasps and files and takes a lot more skill. The OP will get a much better result and a much faster result if he follows my method than if he attempts to use chisels. Commented Jul 19, 2016 at 11:29
  • 2
    Yes entire books are written on sharpening, but that's no reason not to learn to use chisels early on, they are part of the basic kit. Besides, sharpening is a cornerstone skill anyway, getting good at it can't be avoided for anyone who you wants to use hand tools :-)
    – Graphus
    Commented Jul 20, 2016 at 7:48

Your Answer

By clicking “Post Your Answer”, you agree to our terms of service and acknowledge you have read our privacy policy.

Not the answer you're looking for? Browse other questions tagged or ask your own question.