12

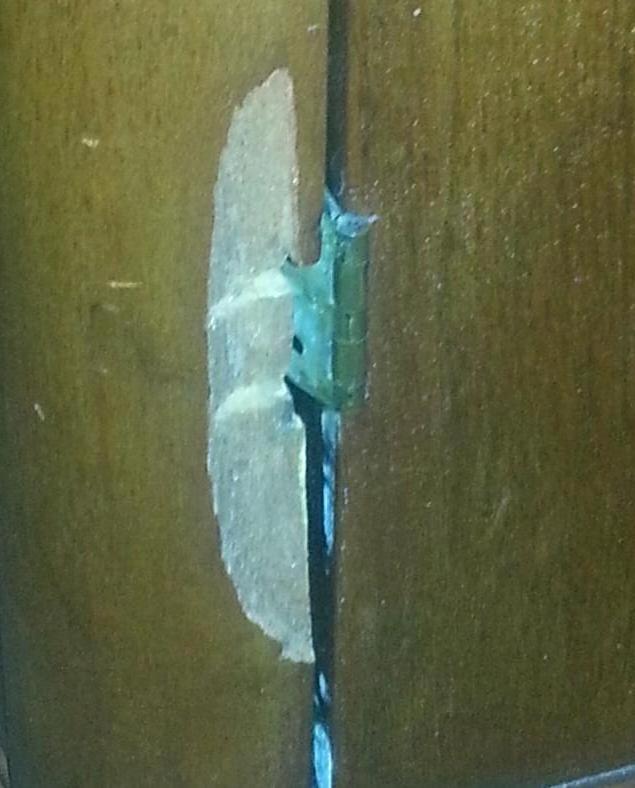
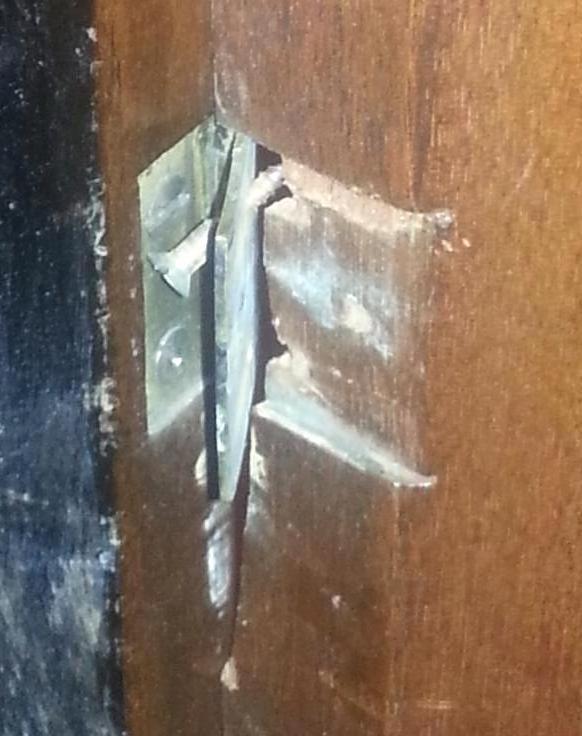
I have a nice wood cabinet that lost a small chunk of wood from the front door in a recent move. (Photos below.) Naturally, that chunk of wood was on the exterior where it's plainly visible and where the lower hinge attaches, thereby rendering the door inoperable.

The missing piece is thin, about 1/4 inch deep at most. All I can think to do is replace the missing piece with wood filler, sand and stain, and drill new holes for the hinge screws.

And then hope for the best and pray everyone is very gentle with that door. It seems unlikely to me that wood filler will hold well because it's a surface repair and therefore wouldn't stand up under the strain of being attached to a hinge.

Are there other options? How can I repair this piece?

Exterior view showing the missing piece:

enter image description here

Interior view:

enter image description here

4 Answers 4

5

It seems unlikely to me that wood filler will hold well because it's a surface repair and therefore wouldn't stand up under the strain of being attached to a hinge.

Well there's wood filler and there's wood filler. There are few commercial varieties that would be suitable for a repair of this nature, but that's simply because they're primarily intended for filling of minor surface defects that don't require anything in the way of structural strength.

Although there are better solutions than filling as a general principle, if you did want to try filling a far stronger compound than most commercial wood fillers can be made at home very easily, by mixing wood flour (sanding dust) with standard two-part epoxy glue. At best this bonds extremely well and is incredibly tough (much harder than the wood it replaces in actual fact) but it's still not the ideal fix in a location like this.


Replacing missing wood with wood is far preferable as a rule where strength is required.

Although it seems like taking a step in the wrong direction the first step is to remove more wood, but you have to create neat clean edges that allow for an exactly matching repair patch to be successfully glued to. In this case sawing out a rectangular piece just long enough to remove all splintered wood is probably the way to go.

Instead of marking out two rectangles, on the door and on the replacement wood, and then cutting both it is better to cut the notch from the door first and then mark your replacement wood directly from it; this is far more likely to result in a tight-fitting repair.

Although a repair of this nature is quite simple to do there are two main difficulties usually encountered:

  • stock selection
  • finish repair

Finding wood that matches the existing furniture can be challenging at the best of times and is impossible at others, so sometimes you have to resign yourself to a close-enough match that is lighter in colour and then use wood dye or stain to achieve a closer colour match before final finishing.

Finish repair is actually the largest hurdle in some ways. Many film finishes, such as this is likely to be coated in, are considered unrepairable so that stripping the whole panel would normally be the minimum that is advised, or the entire piece of furniture in some cases.

I would suggest that you try the former first and strip the door (which would already be removed from the cabinet making stripping easier), then try to match the existing finish across the door and its patch.

How best to match the existing finish would be a good follow-on Question. To best answer it more (and ideally better-quality) photos of the piece may be required.
4

The good news is that your door has a very simple profile, at least that's what it looks like in the pictures. To fix it, cut out a slighly larger rectangle that extends just past the fractured surface. Then make a patch the same size as the cutout, preferably from the same species of wood, with a similar grain pattern.

Then glue and clamp it in place. If you want to go the extra mile, you could rout a tongue and groove on the top and bottom sides to help with alignment and strength, since those edges will be end grain joins.

1
  • 1
    You could even make this a decorative repair, making the patch of a different species, and / or an interesting shape.
    – TX Turner
    Commented Jun 24, 2015 at 13:40
1

A technique I like using which can be applied to several problems such as yours is to fill the chipped-out area with Bondo(as in autobody filler). If the chip out is shallow I like to drill little 1/8 inch holes about 1/8 inch deep to give the Bondo multiple sites to grab onto so the repair wont fall out. Bondo sands beautifully if you use a nicely sized sanding block to shape the repair and prime and paint the repair it should be be almost invisible forever. If you need to put screws into the Bondo repair I suggest drilling and tapping the mounting hole(s) as Bondo is somewhat brittle so be careful. If you are new to this idea try a sample repair on a separate piece of wood just to get a feel for it.

2
  • The piece has a varnish finish and it's plainly visible, so painting wouldn't work. Can bondo be stained to match wood? Commented Jun 26, 2015 at 1:58
  • @Carey Gregory: Bondo cannot be stained , I was offering the suggestion of using the bondo trick to be used in conjunction with painting the cabinets (just my opinion). Commented Jun 29, 2015 at 4:33
1

there are two parts to this the cosmetic and the structural. first remove the door. the cosmetic goes two ways . if you have the piece all the better use a block of poly or a poly ethelyne sheet with a wood block to press down the on top of the piece with gorilla glue or titebond III WITH CLAMPS held fast..

if not then locate a scrap of the same kind of wood, sand/grind the broken area out with a 4.5 inch angle sander grinder (dewalt paddle is my fav) and make a new piece that will mirror the divot. glue into place and then reshape the edges flat.

structural. drill out the screw holes to a size of dowel rod oak or poplar that seems appropriate so that when you drill the dowel out for the screws there will be plenty of dowel meat for the screws to seat in. gorilla glue the dowels in and when cured flat sand and drill out the screw holes. use new stainless Phillips screws.

Your Answer

By clicking “Post Your Answer”, you agree to our terms of service and acknowledge you have read our privacy policy.

Not the answer you're looking for? Browse other questions tagged or ask your own question.