1

I'm restoring 60+ years old small spice rack for my mum - I've "unglued" it with a heat gun and now I don't know how to clean it - it's now in several small pieces, ranging 5cm to 30cm (2" to 12") with thickness from 4mm to 1cm (1/8" to 3/8"), made from pine (probably) and it's quite dirty and black - mostly from grease (it was very close to the stove). It doesn't have any recognizable finish anymore, so it just looks like dirty planks of wood.

I want to clean it, smooth-plane it, glue it back together, put some nice finish on it and give it to my mum for her birthday.

I originally (before ungluing) thought, I would just plane the pieces until they look good again, but since most pieces are too thin, I feel this is not an option (there may be almost nothing left).

I could just replace the thinner pieces, but the only value this spice rack has is a sentimental value and I don't want to replace anything if I can.

So I'm looking for some way to clean the wood (it doesn't have to look perfect) without losing too much of the wood (in thickness I mean).

If I get no usable answers, I'll probably just use dishwasher soap, some steel wool and hope for the best - but I'm afraid I could ruin or warp those little pieces..

What safe and gentle method would you recommend?


After cleaning:

I tested it on upper surface of the bottom (where spice jars would sit).

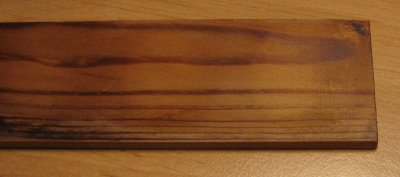
First I used scouring pads with dishsoap, that made most difference.

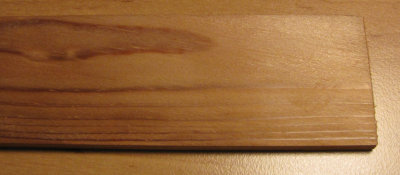
Than I tried mineral spirits (naphta) which made it a little better but not much.

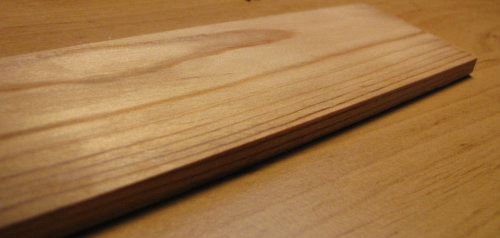
Finally I planed it with a smoother plane - in the end I planed it from 6.2mm to 5.9mm (both sides planed) - i.e. I planed off 0.3mm (less than 1/64") - mostly because there was a lot of raised grain (even before cleaning).

For the rest of pieces I used only soap and planing, that was enough!.

The grease stains clearly haven't penetrated the wood deeply (which is what I was scared of) and it's great - I'm quite happy with the result!

Here are the images from the test piece:
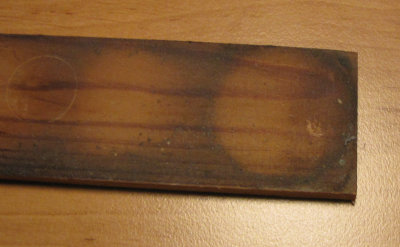
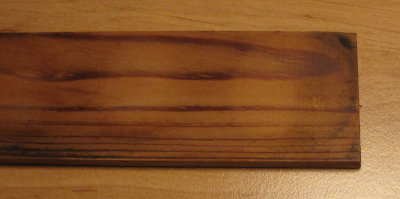
Original state:

enter image description here

Scouring pads with soap and a few minutes scrubbing:

enter image description here

Mineral spirits (naphta) + paper towels:

enter image description here

After planing:

enter image description here enter image description here

7
  • Have you tried any small test patches yet? Bare wood (arguably especially bare wood) can be cleaned using the same things that you'd use to clean a kitchen work surface, including most multi-surface cleaners or 'grease and grime' ones. A more woodworker-y solution would I guess be to go straight to one or more organic solvents and these can work really really well, with zero worries about introducing water as there are with most commercial cleaning agents. Not that I'd be overly concerned about warping, since you can dry carefully to avoid most of it, and likely correct any that does occur.
    – Graphus
    Commented Jun 23, 2023 at 21:15
  • I suspect you won't be able to get the wood as spotless as you'd like with this method alone because you're dealing with a softwood, and the pale earlywood can be so soft. You could clean the bulk of the crud off, then switch to planing to get the wood absolutely spanking clean (as it will be surprisingly close to the surface). If you're good with your plane I wouldn't worry overmuch about the change in thickness, since you'll be losing approximately 0.05mm (yes point zero five, not point five) with each pass, which is literally too small a change to notice.
    – Graphus
    Commented Jun 23, 2023 at 21:19
  • @Graphus ok, I'll give it a try on one of the surfaces that won't be directly visible - I was mostly expecting the grease to be "soaked in" - so I was afraid it could have been fairly deep..
    – Jan Spurny
    Commented Jun 24, 2023 at 21:03
  • 1
    It may or may not be deeper than you'd hope. Wood can be unpredictable this way, but fingers crossed this will demonstrate the fact that penetration into the long-grain surfaces of wood is usually very shallow indeed (as we see all the time from how easily stains can be sanded or scratched through to reveal pale wood).
    – Graphus
    Commented Jun 24, 2023 at 22:14
  • BTW meant to ask, have you chosen the new finish yet? If you're not going for anything new/unconventional I highly recommend wiping varnish (not the type you buy, just a varnish diluted down in a clean jar). It's easy (almost impossible to mess up in fact), looks good, cheap and dries reliably quickly because the coats are so thin. If you have shellac already you can build the finish quickly by starting with the shellac, build up 2-3 coats of that and then finish off with a 3+ coats of the wiping varnish.
    – Graphus
    Commented Jun 24, 2023 at 22:21

2 Answers 2

1

I want to clean it, smooth-plane it, glue it back together, put some nice finish on it and give it to my mum for her birthday.

Sounds like a plan. If I had gone to the trouble of taking the item apart as you have this is precisely what I'd do — clean most of the grease from the wood, then plane off a minimal amount to get it spotless. Planing is an excellent way to get under a soiled surface to reveal the pristine wood hiding underneath.

Regardless of whether the wood is bare or has traces of finish on it you can still clean it in the same ways, using the same things that you'd use to clean work surfaces near the cooker1, including multi-surface cleaners or 'grease and grime' ones.

A more woodworker-y solution is arguably to go straight to one or more organic solvents and these can work really really well, and they come with zero worries about introducing warping as there are with most commercial cleaning agents that are based on water. Not that I'd be overly concerned about warping, since you can can clean and dry carefully to avoid most/all of it (drying on edge being a top tip) and correct any that does occur using various tricks.

Solvent cleaning
Based on experience cleaning a kitchen that hadn't been cleaned in years I would strongly recommend the second option here, and specifically to use white spirit (US: mineral spirits). This is an absolutely brilliant grease cutter, and another advantage of not introducing water is you don't get that semi-emulsified gunk that can be so gummy and hard to rinse away. You will need plenty of white spirit and loads and loads of paper towels, probably much more than you're expecting, but this would be my method of choice. I would follow up with a final once-over with another solvent2 if planing weren't the next step.

It would be advisable to arrange good ventilation, or wear an appropriate respirator doing this because you'll be at it a while. Alternatively use the low-odour version.

I'd wear nitrile or vinyl gloves to avoid defatting the skin on my hands (which can smart, a lot).

I originally (before ungluing) thought, I would just plane the pieces until they look good again, but since most pieces are too thin, I feel this is not an option (there may be almost nothing left).

Because you're dealing with a softwood I suspect you won't be able to get the wood as spotless as you'd like with cleaning alone because the pale earlywood can be so soft. This is why I think cleaning the bulk of the grease off, then switch to planing, is a great option to get the wood absolutely spanking clean.

Planing
If you're good with your plane I wouldn't worry overmuch about the change in thickness, since you'll be losing approximately 0.05mm (yes point zero five, not point five) with each pass, which is literally too small a change to notice. I work with thin wood a lot, and wouldn't hesitate to plane something only 3-4mm thick (~1/8") although I'd proceed cautiously.

Scraping
If you're worried you won't be able to take shavings thin enough you could consider scraping with a card scraper or cabinet scraper instead.

Despite the reputation to the contrary you can scrape softwoods, I do it all the time and have done for years (because when I started scraping I hadn't read "you can't scrape softwoods" haha).


1 For light soiling the old standby of warm soapy water is perfectly sufficient, but for heavy grease (especially old heavy grease which has had a chance to oxidise) it just won't cut it, pardon the pun. Even with boiling water and loads of Fairy liquid (US: Dawn) on a completely non-absorbent surface you're fighting an uphill battle.

2 Meths (US: denatured alcohol) or acetone.

2
  • Thank you, that really helped me - I was mostly afraid I would irreversibly destroy the pieces, so I really wanted to hear what experienced woodworker would do. I really appriciate since I do realize my question may have seemed like a stupid one. I DID cleaned it and I took pictures and I will put them in the original question.
    – Jan Spurny
    Commented Jun 24, 2023 at 21:56
  • 2
    When you're new to something, @JanSpurny, there are no stupid questions. You don't know how to do things and often, don't even know what you don't know. That's what this forum is here for.
    – FreeMan
    Commented Jun 30, 2023 at 18:37
1

If you're nervous about planing, the most effective way to clean it I have found is:

1/ Soap and a small amount of water with a nylon scouring pad.

2/ Rinse the pieces well with warm water, then pop them in the oven at the lowest possible temperature you can (about 50C) for no more than 30 minutes. Flip them once or twice.

3/ If there are any tough stains remaining, they can be bleached out with either a commercially available wood bleach or a homemade solution of oxalic acid (no stronger than 1 tsp per 100ml warm water) if you're feeling confident. Both will need neutralising before further working. Follow instructions for the commercial stuff, and use either a bicarbonate solution or very dilute sodium hydroxide solution for oxalic acid. Bicarb is BY FAR the safest option. Hydroxide is being mentioned because most books mention it, I use it because I am used to it, and it will improve the appearance of the bleached wood grain through chemical "burning" of the wood.

4/ Dry again in the oven, flipping from time to time - basically you're trying to dry the pieces so evenly that they don't have chance to warp much.

5/ Use whatever stain you like to bring the wood to the colour of your choice, and apply your seal coat before regluing.

Hope that helps.

3
  • Welcome to Woodworking, but I'm afraid there's a lot wrong here. It starts with the assertion that this is the best way :-| The thing I want to highlight though is that neither bleach nor oxalic need neutralising. There's a reason that surfaces cleaned with household bleach no longer smell of bleach after a while.... And the standard procedure for oxalic is NOT to neutralise, no trained pro does this & any book worth its salt won't even suggest doing this. But that aside, oxalic isn't called for here because we don't know if there's anything for it to do!
    – Graphus
    Commented Jun 24, 2023 at 3:37
  • Thanks. I've edited step three to show that it is only to be used if needed. As far as neutralising goes - done that all my life and it doesn't hurt. It's needed if you're applying a water based stain soon after, which are the ones I tend to use (find they're more easily controlled than spirit stains.
    – Threp
    Commented Jun 24, 2023 at 3:47
  • @Threp - thanks for a reply - I didn't wanted to use any chemicals if possible, and as it turned out - simple dishsoap was sufficient - but thank's anyway, I'm grateful for any help or suggestions
    – Jan Spurny
    Commented Jun 24, 2023 at 22:45

Your Answer

By clicking “Post Your Answer”, you agree to our terms of service and acknowledge you have read our privacy policy.

Not the answer you're looking for? Browse other questions tagged or ask your own question.