2

I have acquired a Danish vintage teak sideboard with distinctive inset wooden handles that the designer used on a range of pieces. Unfortunately, one of the handles has been damaged over the years and I would love to restore it in some way and would greatly value any advice.

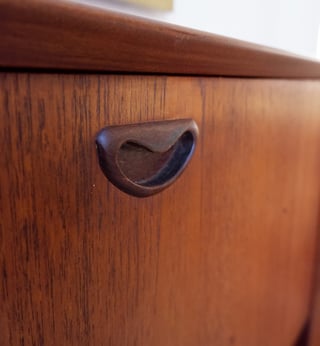
Here is a picture of the handle in a good state. I imagine that the handles were made separately and then glued unto a routed-out hole in the face of the panel. There is no sign of the hole on the reverse face, of course.

Handle in good state

Image from Via Antica

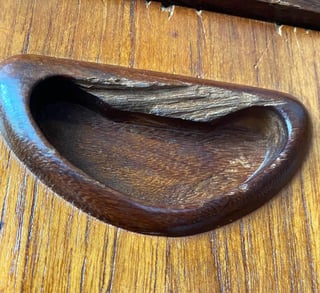
Here is a picture of the broken handle. I guess there is an option of trying to build up new material onto this one, but the handle takes all the force of opening the panel, and I think that this is bound to fail.

Broken handle

I have been offered a spare drawer-front with the same design of handle and so my question is what would be the approach to remove both the good and the bad handles in such a way that the good one then could be inserted back into the panel?
4
  • 1
    FWIW I don't think you'll ever be able to remove the donor handle from its housing, unless you destructively take the drawer front apart if you understand what I mean. any attempt to get that out will surely damage the pull, even careful, light, leverage could easily badly damage the lip. So I think the only way to 'harvest' the handle is to <deep breath> saw off the middle of the drawer front, then meticulously chisel off all the wood stuck to the handle. It's doable, but it's not a job I'd wish on an enemy ^_^ As woodworker I would tackle the job differently [contd]
    – Graphus
    Commented Sep 1, 2020 at 8:51
  • since I can plane the back of the drawer front away until it's the about the thickness of a sheet of veneer, reducing the amount of chisel work considerably (by maybe 70-80%, hard to judge) but I presume this option isn't open to you. Also, don't underestimate how long it'll take to effectively remove the broken handle where you'll be going in from the front. Especially since you have to do zero damage to the surrounding wood! This would be a hellish job. I'm assuming with all of the above that the handles are glued in securely, with a good amount of glue and that this glue is not hide glue.
    – Graphus
    Commented Sep 1, 2020 at 8:54
  • 2
    "I guess there is an option of trying to build up new material onto this one, but the handle takes all the force of opening the panel, and I think that this is bound to fail." Believe it or not, I think most pros would actually go with this option. A well-done joint in wood is literally stronger than the wood, so as unbelievable as it seems if you can get a matching piece of wood glued in place and do it properly the handle would end up stronger than new! It would take a tricky setup to do this so I wouldn't even attempt to describe the method to you, but I bet that's how it would be done.
    – Graphus
    Commented Sep 1, 2020 at 8:59
  • 1
    You have a donor drawer front. It might actually be easier to disassemble the drawer box and put the donor front on it than it would be to remove the handles from both fronts. Assuming, of course, that the fronts are the same size.
    – FreeMan
    Commented Sep 9, 2020 at 15:27

4 Answers 4

3

I may as well mention the obvious:

Don't replace it at all. Since the overall handle is in good shape, and because it is a contoured shape that will be very hard to remove cleanly, you might be better off just repairing the break.

You can use the existing extra handle to match the wood, or go through your scrap pile looking for some sort of match (or contrast, repairs are never truly invisible, so a technique is to lean into the charm of well-lived cabinetry). You want to look for a piece that matches the grain structure and direction. Colour can be approximated with stain or just left as-is.

The idea is you carefully shape both the existing handle and the replacement piece, dry-fitting as you go, to get something that can be shaped to look like the existing handle, which also mates nicely to the existing wood with a decent glue joint. You want to keep the repair pieces proud of the rest of the handle so final shaping is possible.

You could use brads to help keep the position during glue-up.

You'll want to dry fit with your clamping a few times so you get it right. You might need a selection of cauls to get the pressure to the right places.

Once cured, you could use chisels, scrapers, and clever stick-and-sandpaper tools to help merge the repair into the rest of the handle. Stain and finish as you like, either trying to merge the repair into the rest of the handle, or letting it be an obvious battle scar for character.

1

Maybe I missed this in all the back and forth, but I don't see it as impossible to remove the replacement handle by destroying the donor front, and it's not impossible to carefully chisel out the broken handle from the keeper unit. (Having the experience of harvesting the replacement will tell you how much depth of panel you have behind the handle, which will tell you how careful to be when chiseling.)

Alternately (and I'm sure conservators are throwing things at their screen on reading this), you could slice the broken handle flush to the face of the keeper piece, harvest the replacement handle by slicing flush to the face and then epoxying new onto old. This would depend on the original being smaller or equal to the size of the replacement. If the replacement was smaller, then all bets are off. Chances are, things would get a little scuffed and require refinishing, which again has the conservators cursing.

1
  • Your first paragraph is exactly what I was suggesting was the likely expected route. Not the way to do it, but likely the only one viable for the OP. But given how securely I imagine these are glued in it's a ton of tedious work with, let's be honest, not a great likelihood of success for the inexperienced person.
    – Graphus
    Commented Sep 6, 2020 at 8:23
0

It's hard to know for sure without more information (and more, specific knowledge of antique Danish furniture, I'm afraid).

Considering that it's an antique piece, I'm thinking that the piece is glued in with hide glue. If that's the case, you should be able to apply heat (and a maybe a little moisture) to loosen up the glue enough to pry the pieces out of the panels.

I'd try applying the heat from a hairdryer for 10-15 minutes and gently trying to pry the piece out of the panel.

Dissolve/Remove Hide Glue

How to Reverse Hide Glue's Bond

How to Break a Glue Joint in Furniture

NEW INFORMATION: From what I can tell, it is likely a piece designed by Louis van Teeffelen for the Dutch furniture manufacturer WéBé. The company went out of business in the 1990s, but the handle was one of van Teeffelen's "signature" design elements. I'm thinking we now might be able to figure out what kind of glue was typically used by the manufacturer...

7
  • It is likely from the 1950s or 1960s
    – Daniel K
    Commented Aug 31, 2020 at 14:42
  • 2
    Information one can find on how luthiers remove things like fixed bridges (even when attached with PVA glue) should not be discounted. Luthiers have been separating glued pieces since the invention of the craft, so much of the advice here can be found in spades among guitar-makers and such.
    – user5572
    Commented Aug 31, 2020 at 14:44
  • 2
    @jdv, yes good point. But, assuming this wasn't glued in with hide glue (and it pre-dates PVA), I suspect none of that knowledge base would help here. It's my feeling that only destructive removal will get the broken handle out without damaging surrounding wood and second, get the donor handle out without damaging it. Obviously this is based on total guesswork on my part! :-) It's a shame that the no. 1 option isn't open to the OP, glueing on a piece of donor wood! That's the way to fix this IMO, but requires the donor wood and a good workshop setup (e.g. including a router) to accomplish.
    – Graphus
    Commented Sep 1, 2020 at 9:03
  • 1
    @Graphus depending on a lot of factors, this might not be easy, but I will stress that modern guitar makers are experts at separating almost any sort of glued parts. It is equal parts technique and patience in most cases. The idea is to minimize the destruction, to some extent. If the OP wanted to go that route, the first step is seeing how others might approach it. Otherwise, yeah. Just route out the old one, or (what I would do) craft a nice repair that you present as "character".
    – user5572
    Commented Sep 1, 2020 at 13:20
  • 1
    @Graphus we are in general agreement. This is going to be a lot of tricky, patient work regardless. I mention luthiers only because they are literally the experts on separating glued and oddly shaped items in strange locations. Specifically, protein glues are very often reworked in lutherie. And a lot of modern guitars use urea-formaldehyde! Guitar makers are literally experts on glue and glue separation and glue rework. The project we see here is challenging. I'm merely suggesting that research be done, and recommend the pinnacle of experience for some of that research.
    – user5572
    Commented Sep 2, 2020 at 13:39
0

I have a slightly different answer to your question. First, I agree with @jdv "Don't replace it at all." But my reasoning is different.

You said this is a vintage piece, designer made, Danish, and from teak wood. The first rule of antique or vintage designer collecting is: Do not alter things.

The easiest way to deface an antique or vintage piece is to change something, even a broken something. You never sand off rust or re-finish a stained table leg. You don't collect a Gustav Stickley desk and remove a chipped corbel and replace it with one you made in the garage.

These things not only deface the piece, they ruin its collectable value. That's the same as ruining its monetary value. At present, teak is priced right up there with say, gold. You have vintage, Danish Teak, so just in materials alone you're likely sitting on a small fortune. The fact you know it was made by a known Danish designer, most likely makes it even more valuable.

My humble answer is to maintain it as is. Enjoy it as a whole, flaws and all. You might console yourself with keeping the part containing the undamaged matching handle. That way if you ever sell it you can offer it to the buyer so they have the option to attempt an ill-advised repair. Either way, the wood looks beautiful and I hope you enjoy displaying the piece.

4
  • I'm sorry but you fundamentally don't understand the way furniture restoration works. "Restoration" comes in many flavours, from the minimalist (up to and including the "do nothing" advice apparently common on Antiques Roadshow) to complete refinishing, which will often go along with repair and consolidation of any and all breaks and defects. What to do is basically up to the owner and their pockebook, and well done repairs (including complete refinishing) do not ruin collector value, that's a persistent myth. It is badly done repair and refinishing work that does this.
    – Graphus
    Commented Sep 12, 2020 at 8:16
  • @jim that’s a nice answer and a valid view. I would just add that the broken handle makes it genuinely hard to open the relevant panel as things stand.
    – Daniel K
    Commented Sep 13, 2020 at 8:27
  • @Graphus I understand what you're saying and I do not disagree with you. I have done several "restoration" jobs for friends and family in the past and enjoyed the challenge and the outcome. Let me just say, I have never watched an episode of Antiques Roadshow. My information came from literature and catalogs from several of the large auction houses. I was only offering an alternative course for a unique piece. It was not intended to push the owner one way or the other. Of course the decision is up to the owner and his pocketbook and I agree with you on the importance of a quality job too.
    – Jim
    Commented Sep 13, 2020 at 13:12
  • Well you haven't missed much not watching the US version of Antique Roadshow ^_^ The oft-repeated view of the relevant experts on the show is a reflection of the prevailing view of the auction houses etc. What's sad is that, as Bob Flexner has pointed out in various articles and in one or more of his books, this Thou Shall Not Refinish view directly leads to the decay of pieces, since it is finish in good repair that does most to protect furniture pieces (especially if in use) from the ravages of time.
    – Graphus
    Commented Sep 14, 2020 at 10:20

Your Answer

By clicking “Post Your Answer”, you agree to our terms of service and acknowledge you have read our privacy policy.

Not the answer you're looking for? Browse other questions tagged or ask your own question.