2

I'm in the process of building a wooden bed frame, based on a historical original. (It is the viking age Gokstad bed, for those who are interested)

I have some very nice beech wood planks which I'm using. Now, for the legs of the bed I'm planning to glue three pieces of wood together to create those thicker posts. Every leg will end up having three holes to hold the side boards. Two holes going in one direction, and then one hole in between those but perpendicular to the first two holes.

I was thinking that I could just leave room for some of the holes while gluing the planks. Now, I am a little unsure about which holes I could best create while gluing since the legs still need to be sturdy enough.

I've created an illustration to better show what I mean. enter image description here
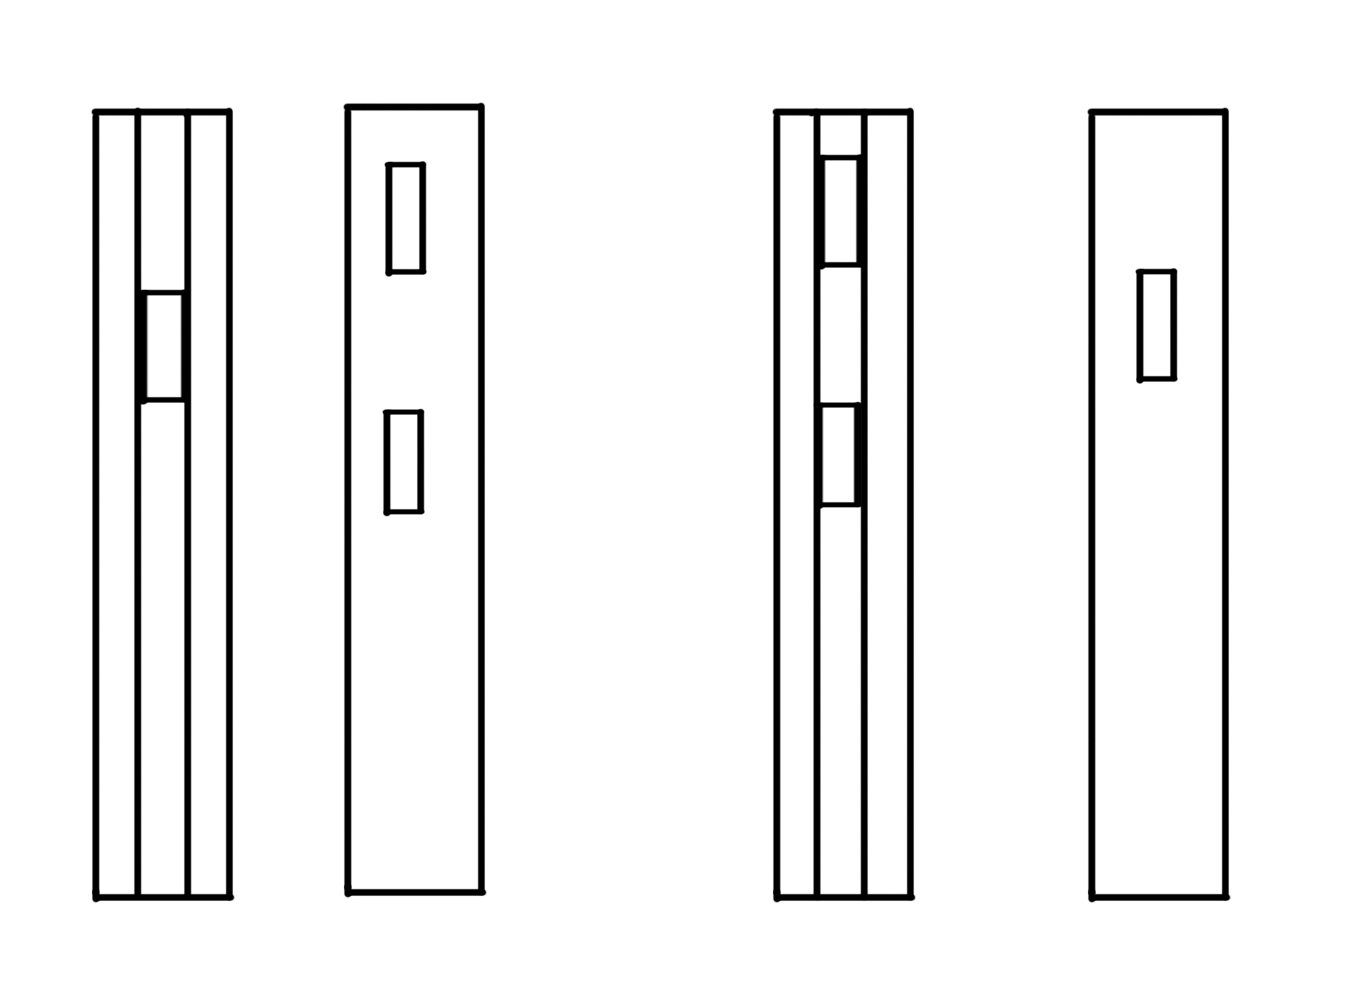
The second option seems to be the easiest since I would then only need to make one additional hole, but I'm afraid it might not be sturdy enough and it would be best to go for the first option, even though it will be a lot more work to create the additional holes.

Note, in the middle of the leg the holes will connect, so you will be able to connect to the second and third hole from the first. This way, the side board will also be supporting each others weight instead of just the legs supporting the side boards.

My question is, could I go with the second option and just glue in two of the holes or would this seriously impact the sturdiness of the legs/bed?

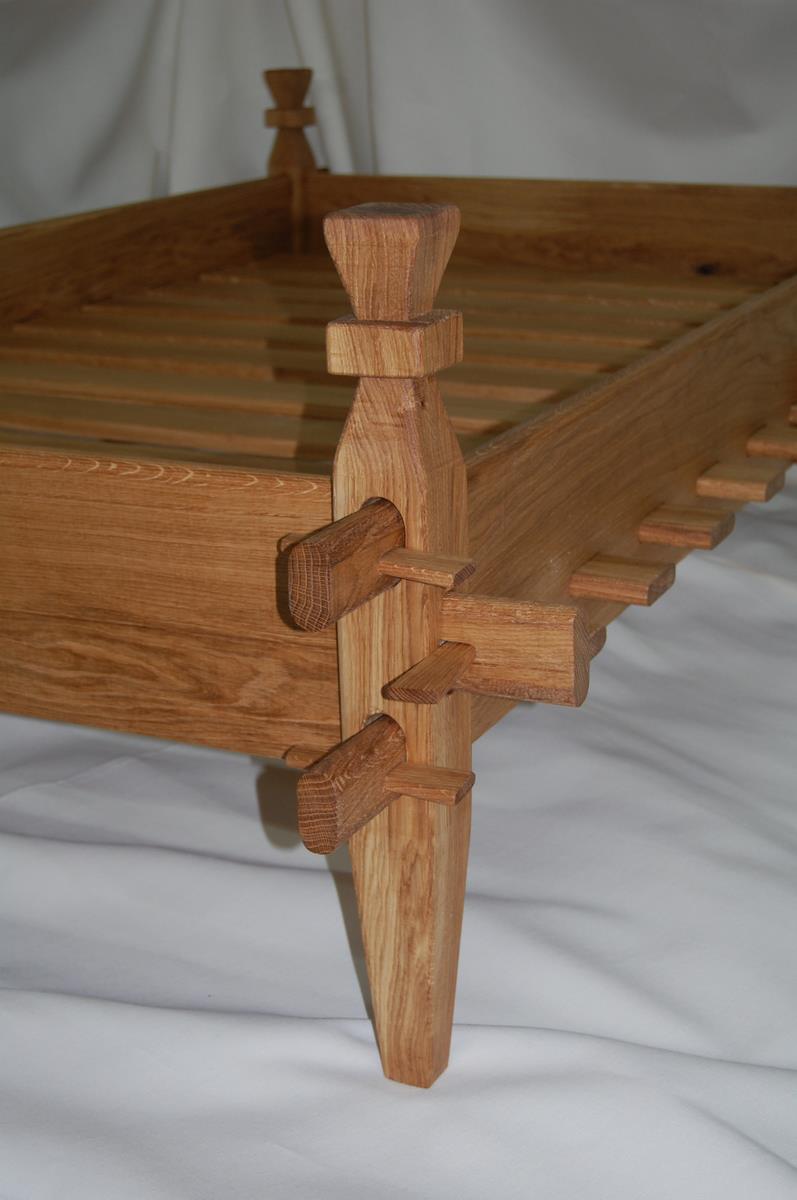
Moderator Edit: *('Graphis supports Monica' added a comment with a link to a photo that illustrates the general character of the bed post connection described in this question. I have attached the photo below so that it will not be lost.)
enter image description here

2
  • Could you show even a rough hand-drawn isometric drawing? I'm having trouble visualizing how this joint works with respect to adjacent edges. And it is unclear what you mean about "holes". In general, tenons and mortices should be cut so they are snugly mated. The main problem with joinery for beds is racking forces. The frame is going to want to rack on both axes, which means tenons twisting mortices or breaking outright, or tenons being pulled out of mortices.
    – user5572
    Commented Dec 4, 2019 at 17:27
  • @jdv, good photo of the corner post in a modern recreation of the Gokstad bed here.
    – Graphus
    Commented Dec 4, 2019 at 20:58

2 Answers 2

3

I was thinking that I could just leave room for some of the holes while glueing the planks.

This is a useful technique when glueing up posts in this manner and is actually relatively common these days. You essentially leave a mortise instead of chiselling it out afterwards.

The second option seems to be the easiest since I would then only need to make one additional hole, but I'm afraid it might not be sturdy enough

This will be fine. It's how I'd choose to do it if I were making something similar in this way.

Glue joints are literally stronger than the wood around them if done well (see a little on how to ensure that here) so there should be no worries about strength with this sort of assembly. Numerous modern workbench designs create mortises for the stretcher tenons by this method, and workbenches are subject to tons of strain in use. If this building method can withstand that it'll be fine for a bed.

Some assembly tips

  • Rather than go by measurement it's better to actually use the boards (or offcuts from them if available) as spacers during the glue-up.

  • Well wax the ends of the boards/offcuts so they won't be stuck in place by any glue squeeze-out inside the joint.

  • These are large glue surfaces, make sure in advance you have enough glue! This will require more glue than you're probably thinking. And have a good method for spreading it on such a large surface.

  • Be prepared for the glue squeeze-out and have a method ready and practised for dealing with it.

  • Also have all your clamps on hand ready to use, if necessary pre-adjusted for width so you're ready to clamp up as soon as you've finished applying your glue.

  • Don't be afraid to clamp hard. You can't starve a joint by clamping too hard (this is actually impossible) and only by using firm clamp pressure do you achieve the strongest joints. Use scraps of wood, ply or hardboard to pad the clamps if necessary to prevent denting the beech.

2
  • 1
    To add to this: Look at tutorials for glue spreading. You can use scrap wood to make sure the clamp doesn't mar the face of the wood. Make sure you pay attention to the lateral translation that can happen while laminating wood to make sure you don't have excess poking out on one side and a gap on the other.
    – BryceH
    Commented Dec 4, 2019 at 17:20
  • Thanks a lot for the tips. I'm glad to hear that I'll only have to chisel out four additional holes instead of eighth.
    – Vikinglady
    Commented Dec 5, 2019 at 10:46
-1

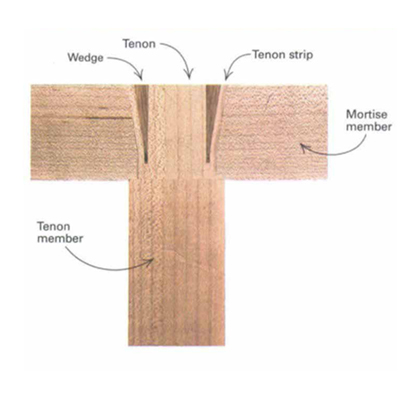
Have you ever considered a Wedged Mortise and Tenon?

All of this information is coming from Popular Woodworking Magazine. The only modification would be to the mortises you have planned, and you could choose to use a different piece of wood as an accent if desired.

  1. Make Mortise
  2. Use a chisel and an 87º angled support block (easy enough to create with reliable chop saw or desired jig) to slightly taper the FACE of the mortise (just in case, opposite of the tenon's shoulders) about 3/4 of the way down then joint.
  3. Flip to tenon shoulder side and finish squaring the joint if needed.
  4. Designing the joint can be varied based on your design. The nutshell version of the site is: Make sure the taper is between 3º-8º (the wider the angle the stronger join will be). Be careful that you don't make it so wide it splits when you insert your wedges.
  5. Cut your tenon.
  6. Draw a center line on the tenon (shoulder side) where the taper goes from 87º to 90º.
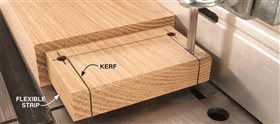
  7. Using a drill bit (preferably in a drill press - but just perpendicular to the tenon) , on the tenon's shoulder side and near-ish to the edge of the tenon - drill straight through the tennon. The recommend making a test piece to practice with the flex of your wood and wedges. Image below for clarification.
  8. Using a thin kerf blade, saw on the medial side of the drill hole make a perpendicular cut from the through side of the tenon down to your hole. This creates the space for your wedge and allows the joint to flex more freely without risk of splitting.
  9. Make extra long wedges that meet your needs. Article recommends 1/8"-1/4"
  10. Test fit joint and wedges. The shoulder side should be tight and flush. Until you place wedges the face side should have a slight gap. Just in case... tap in both wedges evenly. Not one then the other.

Should there be any excess proud of the face, you can carefully remove the wood to flush.

Drill holes for flexibility

1
  • 2
    This does not appear to be relevant to @OP's question, which is about how to build a specific style of leg. Commented Dec 4, 2019 at 21:53

Your Answer

By clicking “Post Your Answer”, you agree to our terms of service and acknowledge you have read our privacy policy.

Not the answer you're looking for? Browse other questions tagged or ask your own question.