8

TL;DR

How do I connect the MDF sheets on the corners (in left-hand-side picture), so they align nicely, and there's no gap? As you can see in the sketch, the angles are not always multiples of 45 degrees.

Backstory:

One day I got bored, and wanted to play some Pac-Man. Playing it on PC didn't really feel right, so I decided to buy an arcade cabinet. After checking the prices on eBay, I made the best decision... "$1,500 for a cabinet? I can build this myself!"

Needless to say, it's a great idea for someone with no prior woodworking experience...

Anyway, I am moving forward quite nicely, but I've stumbled upon a problem for which I can't seem to find a solution.

I am wondering how I can connect MDF sheets together, so that there isn't be a gap between them - basically, how can I cut them at an angle (and what tools would you recommend for that purpose?).

In the image I am attaching, you can see my rough sketch of arcade cabinet on the left. How am I to connect the top sheet and back sheet together? They join at a slight angle, leaving a visible corner gap, and I want to achieve the result on the right, where the joined pieces blend together seamlessly.
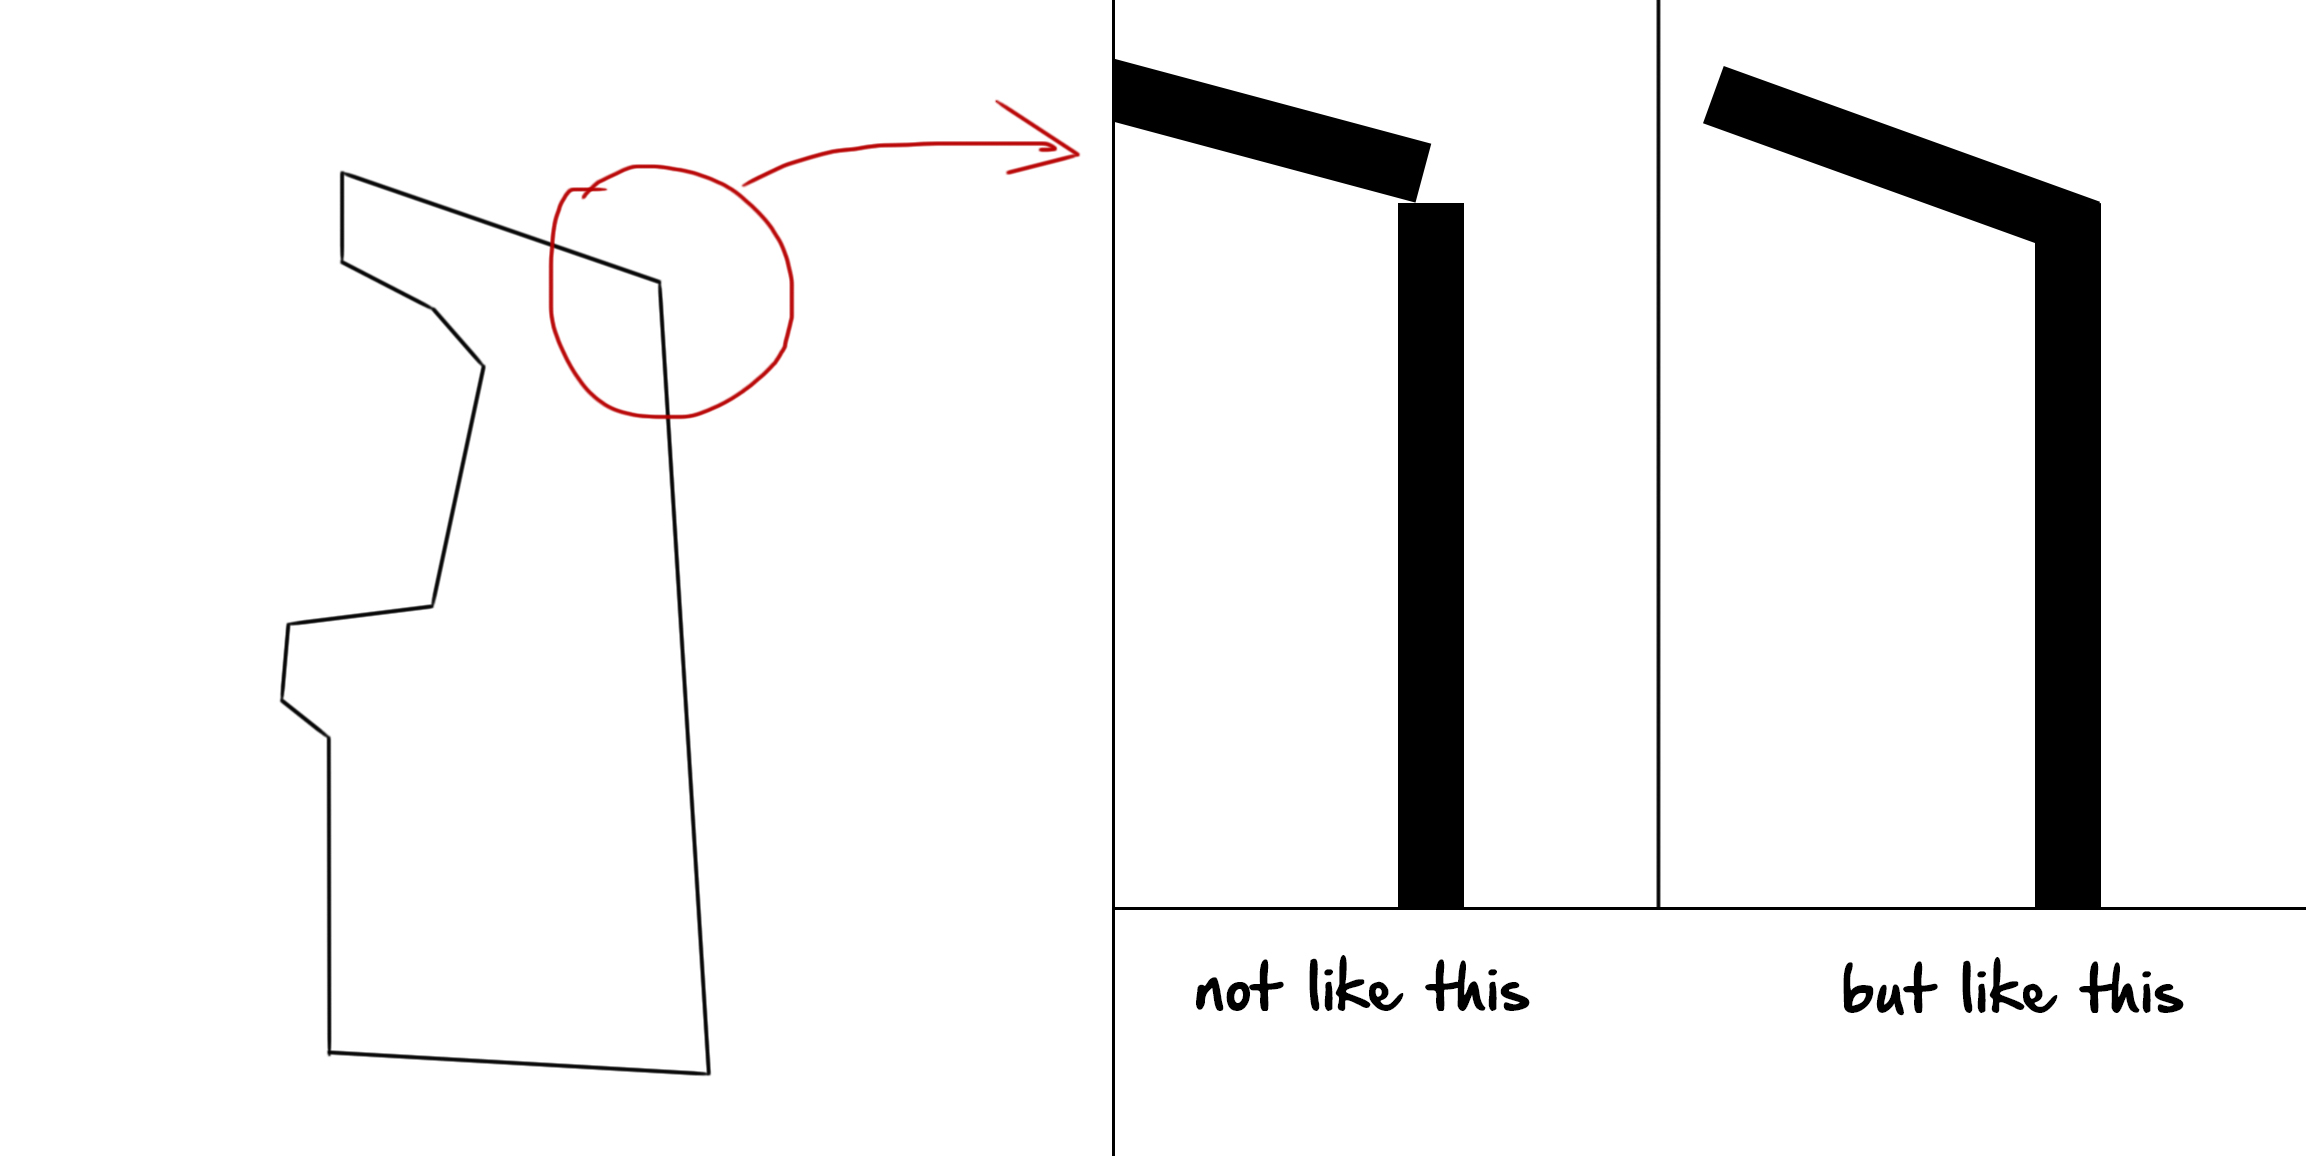
MDF corner joining

1
  • Not to discourage you from building your own (because it's a great project), but depending on your region, you can probably find a broken arcade game or gutted cabinet locally for a few hundred bucks or less. In my area, working stand-up arcade games and even some sit-down racing games sell for well below $1000, and $1500 is about the entry level for a decent pinball machine.
    – rob
    Commented May 28, 2017 at 16:23

3 Answers 3

6

It sounds like you want a mitered corner.

You will want to find the overall angle of the piece in relation to the vertical one. Just a guess but it looks like it is 15-20 degrees above horizontal level from the corner. Lets go with 20°.

The overall angle is 90 from the vertical piece to the level + our 20 above for a 110 degree inside angle.

This means the outside is (360-110=) 250.

Now you want a matching miter on both pieces so they line up, which means you will put half of the angle on each piece so they add up to 20.

You can come at this two ways, since the line of the angle through our imaginary 360° circle goes through both sides.

You can take 110/2=55, but you aren't cutting your piece on end so that's the wrong plane. You don't want 55, you want 90-55=35°

Or, 250/2=125-90=35°

Either way, you want a 35° angle on your saw.

If you have a table saw or skill/circular saw you can set the angle to 35 and cut the edge of both pieces. They will come together at our 20°.

(You can also think of it that if you started with a square 90° corner you would have two 45° miters, but you want to raise it 20, so you take 10 off of both. That may help you visualize it)

This process will work for any of your corners and is easy for any corner 90° or more. Sharp corners with inside angles less than 90 will not be possible with saw a that only miter up to 45°. Also note, this is only for single angle miters. Pieces that come together with angles on two planes (ex. crown moulding) require additional calculation.

2
  • Good answer! I wasn't thinking as much about the angle because he needs to figure that out. But that is really helpful for finding the angle. I just gave him ideas for assembly.
    – Ljk2000
    Commented May 28, 2017 at 14:34
  • I need to bookmark this answer and re-read with a pencil in hand in the shop. Golden.
    – user5572
    Commented Oct 12, 2018 at 15:16
8

The other answers are great from a technical standpoint, but they overlook the much simpler solutions which are actually used on mass-produced arcade cabinets. If you look at commercially-produced arcade cabinets, you will find that the construction methods are much simpler than you might expect.

For example, the TMNT "Turtles in Time" cabinet that is disassembled in my garage has a recessed top which is captured with dadoes in both sides. Another design might use cleats around the interior perimeter, allowing you to simply drop the top into a recessed area and optionally screw it down. You don't need to miter anything for an exact fit, because nobody will see it if you build it right.

One not-so-obvious woodworking skill is knowing when appearance matters, and in this case it doesn't because the back of an arcade cabinet is not really meant to be seen, and the particular joint you are concerned about can be easily hidden by extending the sides above the top of the cabinet, as is the case on commercially-produced arcade cabinets. You could also hide it with some tape or trim. The point is, you can tweak your design to hide any eyesores, allowing you to save yourself a lot of work and frustration by using simpler construction methods.

1
  • 1
    Not to mention that rabbets or dadoes might make a better joint than a mitre with this material.
    – user5572
    Commented Oct 12, 2018 at 15:02
3

Welcome to Wood Working Stack exchange. I would get a table saw for this cutting. It will allow you to cut any angle from 0* (90*) to 45*. You need to find the angle(s) in which you have to cut. It is not necessarily going to be 30* and 30* to get the angle you need. You may have to use two different angles. When you find the angles I recommend that you take another piece of wood and cut the angle used onto that piece. It can be scrap. It will serve two purposes. 1) Use it again to re-position the blade. 2) Test piece. All ways good to double check that your getting getting what you want.

To glue I would try the tape method to glue your project together. With the two pieces next to each other lay the inside part of the board on the table, with the back facing towards you. Take some good tape and put strips connecting the two pieces together. Flip the board over and glue the one side (I only do one side, others do both) and find a way to clamp the pieces together. The tape will help with holding the board were you want it. It does not necessarily need to be glued on hard. Of everything goes right then you got what you need.

There is another way to go about this project. Make the side piece. I would use a rabbet router bit to make a groove on the top and back. To help along the boards. You will still need to make the top and back with the right angles. But this time don't worry about gluing the back and top (as much). Glue the top piece to the side (make sure 90 with a square). Then take the back and line the back with the tops angle, also glue that and the back to the side at the same time. That should get you a nice turn out as well.

Note: You don't necessarily need a table saw. A circular saw would work but I highly recommend to use a straight edge to run the saw against to ensure a straight cut.

So there is the two things I thought you could. Good luck with the project!

1
  • "You may have to use two different angles." If the two sheets are of the same thickness, and he wants the the join to have no gaps or overlaps, the angles MUST be the same. If they are not, the angled faces will have different dimensions, and will not join perfectly. Commented Oct 14, 2018 at 2:58

Your Answer

By clicking “Post Your Answer”, you agree to our terms of service and acknowledge you have read our privacy policy.

Not the answer you're looking for? Browse other questions tagged or ask your own question.