You have two things happening here. First is loose pocket hole plugs. Second is tear-out of the veneer face of the plywood.
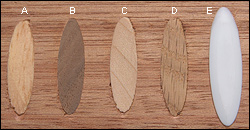
For the problem of loose pocket hole plugs, you will want to make sure you are drilling straight and not moving side to side as you drill, accidentally widening the hole. For the most part, the jig prevents this, so I'm not really sure that's your problem. In fact, I'm not really sure you have a problem: your work looks similar to lots of other examples of pocket holes I've seen. For example, here's an image from Lee Valley, showing examples of the plugs they sell:

Image credit: leevalley.com
Their fit is very similar to yours. If the plugs simply do not fit to your satisfaction, you might want to try making your own pocket hole plugs instead of
using the store bought ones. There are various instructions on how to do this around the Internet. Here is an example that uses a specialized table saw sled, and here is a simpler one that uses the pocket hole itself as a jig.
For the problem of veneer tear-out, you'll need to adapt one of the usual techniques for dealing with tear-out to work with pocket holes. The techniques I am aware of are:
- Using blue painter's tape to reinforce the veneer.
- Using a sacrificial backer board to support the fibers being cut.
- Scoring the veneer along the area to be cut.
Option #1, reinforcing with blue painter's tape, would be the easiest thing to try, so I'd probably try it first. This technique works very well to almost completely eliminate tear-out when cutting veneered plywood on a table saw. I imagine it would work pretty well with the pocket holes, too. The only downside is getting sticky painter's tape residue all over the saw blade/drill bit.
Option #2 is to support the fibers with a sacrificial board. Clamp a sacrificial board to the face, so any pressure on the fibers to move up and off the face of the board is counteracted. The sacrificial piece will need to be a known thickness, say, 1/4" thick, so you can adjust your pocket hole jig accordingly. I.e., instead of adjusting the jig to drill into 1/2" stock, adjust it for 3/4" stock. A caveat here: normally the tear-out you're trying to prevent is where the blade/bit is exiting the stock, i.e., on the back, so normally this is a backer board. You're trying to prevent tear-out on the front. But it might be worth trying anyway. I think the drill bit is probably lifting some of the veneer's fibers up and off the board as it cuts, and supporting those fibers would help make the cut cleaner.
Option #3 is to score the veneer where it's going to be cut. I'm thinking this would be the trickiest of my three options. To do it, hold a plug against the location that will eventually be cut away, and trace it with a sharp knife to score the veneer. It would take some experimentation to figure out where the plug should be held, as this isn't something that is entirely clear from the jig setup. But if you can manage to score the odd shape in the correct location, I think this option would work well.
For any of these, I'd want to experiment with my technique on representative scrap before using it in my project. But honestly, that advice is applicable any time you're trying a new technique.

