12

I'm practicing building drawers, quickly and on the cheap. The drawers I'm making now have sides that are 3" high x 7/16" actual thickness, decent quality birch veneer plywood.

I know this is really basic, but I'm struggling with the corner joints on the drawers. The reason I'm practicing is ultimately I want to build a few storage cabinets with about 40 drawers total = 160 corner joints I'm going to have to make. I'm trying to come up with a workflow that is both quick and precise. I also really want the joint to be hidden. I'm not too concerned about super high strength.

The relevant tools I currently own are:

  • A table saw, one of the cheap but relatively decent Ridgid ones.
  • A biscuit cutter, the Makita one.
  • A Kreg jig.
  • Tons of clamps of various sizes.
  • A portable bandsaw with a little table for it, although the miter slots aren't lined up properly with the blade.
  • A scroll saw.
  • A trim router, hand-held, with a makeshift table. 20000 RPM min speed and terrifying. In the table usually I just end up shooting large wooden projectiles across the room.
  • All the basic stuff, drills, hammers, chisels, various hand saws and such.

There's countless ways to join corners in theory but in reality I'm actually really having a hard time with even the most basic stuff. The techniques I've tried so far have been mostly successful but not quick or easy -- at least not as quick and easy as I'd like them to be -- and also pretty error prone:

  • Butt Joints:
    • Using glue only, do the clamp-a-square-thing-into-the-corner technique. I put wax paper in the corner to keep the square from being glued to the piece. Problems:
      • It's actually very difficult to keep the joint flush and straight while at the same time somehow positioning the block in the corner, putting two clamps on, and not getting glue everywhere. It's really easy for this joint to become not flush any more.
      • It's impossible to wipe wet glue off the interior corner, and it tends to squeeze out and be forced along the wax paper and make a big mess.
    • Current best: Using glue only, use these 90 degree clamps, one on top and one on the bottom. This is the best technique I've found so far, but it's still pretty rough. Problems:
      • It's tough to position the wood in the clamps so that the outside remains perfectly flush. It's totally doable, but takes more finesse than I want it to. It's a many-step process to get everything set up to be flush.
      • I only own 8 of these clamps, which means I can only glue up 1 drawer at a time. At $10 each I'd need to buy another $80 of hardware that I wouldn't really need for any other project just to raise my throughput to 2 drawers at a time.
    • Biscuits for alignment: Should work in theory. Problems:
      • In practice it's very difficult because despite how often I've practiced with this thing, I have yet to discover a good technique for perfectly straight, positioned cuts on the side that you have to cut into the face of (i.e. the end-grain cut is easy, but I really have a hard time keeping the biscuit cutter straight and properly positioning the biscuit on the face cut).
      • It's tricky to design everything so that the biscuit doesn't interfere with the dado I've cut for the drawer's slide track.
    • Line up the butt joint, drill pilot holes, glue, and screw it together. Then remove the screws after the glue dries and plug the holes. The main problem with this is it takes forever, and still has the same difficulties holding the joint true and flush.
    • Pocket holes: The Kreg jig just doesn't do that well with 7/16" thick material, it's a bit too thin, and the plywood tends to get torn apart. Plus, same alignment difficulties when driving the screws in. Also I have to use these just as temporary screws, because since the material is so thin the screw heads hang out past the face.
    • Nails to temporarily hold wood in place. Same set of problems as above + lots of bruised fingers. And the nails end up permanent, really hard to pull nails back out without tearing up the pieces. I don't want the nails to be visible on the outside.
    • Drill holes, insert dowels: Aesthetically acceptable but a huge pain and has same alignment issues as just putting screws in.
  • Rabbetted corners: I can't actually figure out how to cut these quickly. I can do it on the table saw but making the two rabbets line up properly is way harder than it sounds. Also this doesn't really gain me anything at all in terms of speed or alignment ease over gluing the butt joints.
  • Tongue-and-groove variants: No idea how to cut these easily. Same difficulty getting the tongue and groove to line up properly as with the rabbets. Plus the plywood starts to become very weak and the thinner bits tend to snap off during assembly.

So how can I do this, in reality, given that e.g. my grandfather hasn't been passing on his mystical woodworking knowledge to me for the last 35 years of my life? I'm just a normal person, not one of those legendary woodworking samurais who can hand-cut perfect dovetails in 5 seconds, while drunk, with their eyes closed.

I'm really struggling to find a quick and precise technique given my current set of tools and fine motor control skills. It's easy with large pieces but the 3" x 7/16" plywood seems to be introducing new challenges.
10
  • 1
    Biscuits: use the workbench as the reference surface for the drawer fronts. (In other words, set the drawer front with the exterior face down on the bench.) If your biscuit joiner doesn't space the biscuit properly that way, put a shim of something thin under the drawer front to get the spacing right. Then the drawer sides are just a matter of clamping the sides upright (up against the wall, maybe?); using the same shim underneath and referencing everything from the workbench. Having a couple of biscuits will improve your alignment/glue-up massively. Commented Sep 4, 2016 at 4:37
  • 2
    Oh, and if you weren't joking about shooting projectiles with your router table, you're probably feeding the wrong way (or not using a fence...). Feed so that the cutter on the router is pushing back at you. Commented Sep 4, 2016 at 4:41
  • 1
    Aaah, I get it. I guess my best advice is to be safe. And if that means limiting or eliminating certain actions, that makes total sense. Commented Sep 5, 2016 at 22:27
  • 1
    Also, when I was new to it, I had the problem of stuff flying across the room when I tried to use the router table. I was trying to think of the router like a table saw, where I'd line something up to the fence, and then move the work piece into the blade. This isn't the proper technique for a router table, though. Instead, you're supposed to get it started by putting one corner of the work piece against the fence, and then angle the other end and slowly push it into the bit until the work piece is flush against the fence. Only then do you proceed to push the work piece through its cut. Commented Sep 6, 2016 at 15:21
  • 1
    (Maybe you know that already, but this was my problem when I started with the router table. I had the same shyness you describe, and this was what I was doing wrong. Once I got up the nerve to start using the router again, I watched some YouTube videos on router technique, and it immediately jumped out at me that this is what I was doing wrong.) Commented Sep 6, 2016 at 15:23

1 Answer 1

9

It's actually very difficult to keep the joint flush and straight while at the same time somehow positioning the block in the corner, putting two clamps on, and not getting glue everywhere. It's really easy for this joint to become not flush any more.

Butt joints are inherently prone to shifting about as you're trying to clamp, glue is very lubricative and it's just two flat surfaces trying to slide past each other.

Like anything you'll get better at juggling things with practice and by slightly improving how you go about it. For example without any other changes to your current setup you could have an easier time of it, e.g. by using more and/or different clamps — quick clamps shift slightly at penultimate grip point, four smaller clamps allow for much less shifting or rotation than two large ones. But best and simplest of all, clamping firmly to one board before you've even applied glue. Yeah I didn't think of that last one early on either, obvious though it is.

In addition there are a few simple things that can really help you out here. The most simple being a larger block. If it's nearly the full 3" height it gives you a much larger registration surface so reduces the ability of the drawer pieces to rotate on the horizontal axis.

One step up from this, build a dedicated right-angle clamping fixture specifically for this drawer size. Same basic benefit of the much larger block but slightly lighter and easier to manipulate.

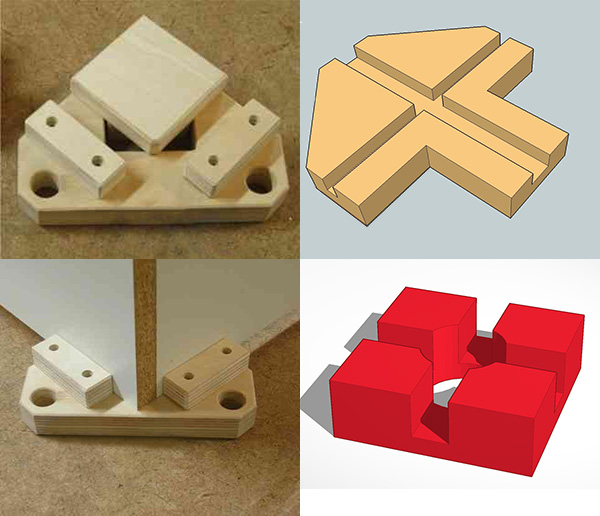
Or best of all, make yourself a set of something like these:

Corner clamping jigs

As I hope is clear from the picture you can form the grooves by glueing and screwing blocks in place on a base board, or routing crossing dados at a perfect 90°, whichever is simplest for you.

Also have a look at the version locked by wedges, such as this one on Lumberjocks, reducing the number of clamps being tied up during the process to nearly zero.

It's impossible to wipe wet glue off the interior corner, and it tends to squeeze out and be forced along the wax paper and make a big mess.

You can try applying slightly less glue to the inside edge to try to limit squeeze-out on that edge, but the first thing I would do is ditch the wax paper. You can get away with this by relieving the inside corner of the block or clamping fixture, so the glue will just squeeze out and stay put (to be cleaned up later, at the rubbery stage or after hardening).

I think butt joints have a lot to recommend them for quick-and-dirty drawer construction where you don't need a lot of strength. It's very easy however to add something to them to take them up a notch, making the joint very much stronger while allowing for perfect registration during the glue-up.

Biscuits are obviously one of those.

It's tricky to design everything so that the biscuits don't interfere with the dados I've cut for either the drawer tracks or the bottom panel.

Don't use two biscuits. A biscuit is a linear alignment aid already so inherently helps to keep things straight. Two is overkill on a 3" joint face.

Dowels are another.

These are a favourite solution of mine because they're so simple and pre-date biscuits and Dominoes. They offer the same assurance of alignment, and reinforcement of the joint is just as good if not better, with the key benefit of requiring no specialist (expensive) equipment to be bought. At the most basic you can do it using one drill, one bit and some dowel rod*.

Drill holes, insert dowels: Aesthetically acceptable but a huge pain and has same alignment issues as just putting screws in.

One or more of the above tips should solve your alignment issues but if you were forced to work without aids something you can do to make drilling easier is instead of drilling after glue has been applied to make the joint slippery, do it before.

It seems like one additional step that just adds to the workload but you could set up a production line to do the operation repeatedly (the heart of all mass production) and you'd work through them all in no time. Then come assembly time everything is ready to go, greatly speeding up that part of the operation so you'd probably have a net gain in speed.


*Modified as needed, fluted or grooved and with the leading edge chamfered.

4
  • Thanks. Just wanted you to know that this has not gone unappreciated, I just won't be able to give it proper attention for a day or two. Quick comments: My biscuit problem description was misleading, I'm only using one biscuit. Long story short for that Makita biscuit cutter to work with 3" or narrower pieces you have to use an attachment that essentially disables height adjustment, so the biscuit is at a fixed position and options become limited. Also those corner clamps, I made some from wood yesterday, problem there is glue sticking to clamp, and same alignment problems as...
    – Jason C
    Commented Sep 5, 2016 at 16:50
  • ... the Bessey clamps. But I have an idea to make a T shaped one instead of a cross shape to solve the alignment problem and make it easier to keep the corners flush I'll try that next. For the glue Im thinking maybe some paste wax on the clamp will do the trick? I'll update my post with these details later when I'm not on my phone. I really wish I had a proper router table with an accurate fence.
    – Jason C
    Commented Sep 5, 2016 at 16:50
  • 2
    @JasonC Yes a good waxing will prevent glue from sticking (paste wax is so useful in the shop!) but as well as that you should probably relieve areas of the block that come into direct contact with the corner joint, so like the red one above drill a big hole through and any glue dripping out the bottom can't stick to it.
    – Graphus
    Commented Sep 6, 2016 at 7:03
  • 2
    In case it isn't obvious (and sometimes the obvious things aren't until you see it spelled out), you should also take the square thing you're using to clamp the sides and cut one corner off, so if/when glue squeezes out, it doesn't glue the block to the work piece. Basically the same thing Graphus said, but I'm pointing out that generally anything you use as a jig or support for gluing -- and specifically for the clamping blocks you're using now -- you should consider cutting a relief channel for the glue to squeeze out. It's a quick thing to do that saves a lot of headache later. Commented Sep 6, 2016 at 15:40

Your Answer

By clicking “Post Your Answer”, you agree to our terms of service and acknowledge you have read our privacy policy.

Not the answer you're looking for? Browse other questions tagged or ask your own question.