0

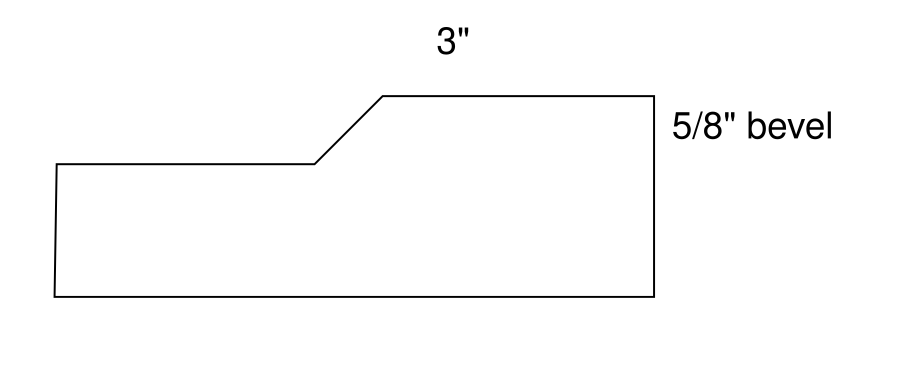
I sometimes need to make a mid-surface bevel in wood from 2' to 8' long as shown below and am wondering what recommendations there might be for good ways of doing it (without using a custom blade).

enter image description here

In the example there 3" flats on both sides of the bevel, but the distance could be longer.

One way I have done these if the flats are 3" or less is with the table saw. The challenge is always the crease. Because the two cuts end in corner, getting that corner clean and consistent is the tricky part.

Please give a specific setup, not just vague description. Don't just write "use a router". How? Show the exact setup. Note that that the router bits that I have seen for a 45-degree bevel all have a bearing on the top.

2
  • Three needed details come to mind. First two: how good is your table saw, and do you have a router table? Both could be used to do this, reliably and with good repeatability IF they can hold their setting. Obviously a trial piece or pieces would need to be run to dial in the two cuts (table saw) or the bevelling step after the rebate is created (router + whatever means were used to do the rebate). Third question relates to the "3" flats... but the distance could be longer" how much longer, exceeding the max cut possible on your TS?
    – Graphus
    Commented Jan 23, 2021 at 17:37
  • 2
    "V-groove" are what angled bits without top bearings are called. You can get them in a variety of angles, but 45 is probably the most common. Commented Jan 23, 2021 at 21:56

1 Answer 1

3

One way I have done these if the flats are 3" or less is with the table saw. The challenge is always the crease.

Forget for a moment about the beveled part and think about how you'd do this if there were just a 90° step. That's really nothing but a wide rabbet. One way to cut that is to use the table saw to make one cut from the edge and a second one from the wide face. The key to getting a nice sharp inside corner for your rabbet is to nail the blade height and fence settings for that second cut. Use the same two reference faces, i.e. the one against the table and the one against the fence, for both cuts to minimize error. A reliable set of calipers will be a huge help -- it doesn't matter if they're digital or vernier, and you don't even need to read the measurement. Just measure the depth of the first cut and use the depth blade on the calipers to set the rip fence's distance, and then measure the distance from the cut and again use the depth blade to set the blade height.

Cutting the bevel is the same thing, done the same way, except that you need to tilt the blade. This time, for the second cut, you'll need to be careful to measure exactly to the highest corner of the highest tooth on your blade. The corner of that tooth is going to land in the corner of the bevel, so it's critical to get both the height and the fence setting right for a clean corner.

Take the time to set up featherboards (or your whatever your favorite sort of stock guide is) for both cuts to ensure that the workpiece stays tight against the fence and the table for both cuts. If you're working with long pieces, infeed and outfeed supports will also help.

Once you've made both cuts, you may still need to clean up the surfaces to remove saw marks. Your waste piece will have a matching angle, so you can wrap a piece of that waste with sandpaper to create a sanding block that'll get into that corner. (A spray adhesive like 3M 77 is a great way to attach the paper when making impromptu sanding blocks.)
1
  • Exactly this. With the one niggle for the unclarified "but the distance could be longer" for the flat to the left of the bevel which could necessitate a different methodology for at least that portion of the machining.
    – Graphus
    Commented Feb 20, 2021 at 9:22

Your Answer

By clicking “Post Your Answer”, you agree to our terms of service and acknowledge you have read our privacy policy.

Not the answer you're looking for? Browse other questions tagged or ask your own question.