0

TLDR: how to make a hole with a small tooth guide key, i.e. with a section like the inside of a 'power on' symbol

Long read. I am trying to replicate a molded plastic hinge in wood. It is a hinge with a twist, in that it is intended to drive/rotate the slotted keyseated shaft that slots into a 1x1mm key on the inside of the 9mm hole.

Longer read. It may sound ridiculous and definitely like a waste of time, but I am sorry to throw out a toilet seat by Ikea which has lived longer than any in the house. It is detachable and the hinges are in plastic and do not suffer corrosion. It is an over-engineered design that, AFAIK, is out of production. I have not found anything similar as a replacement.

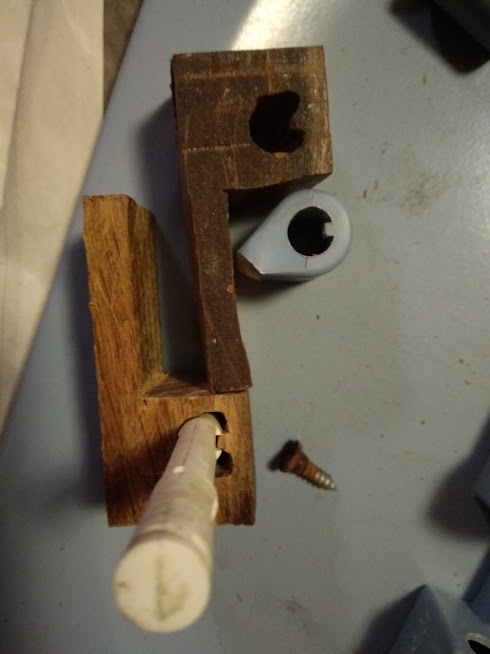
broken plastic hinge, experimental wooden replacement

I have a working solution, certainly not elegant. It was made by drilling an 8mm hole, digging out two channels around the key using a Dremel and long carving bit, with some help from a penknife and a small round file, and widening the sides of the hole.

I thought about making a 9mm hole and digging out a 2x1mm keyseat to fill with a 3x1mm key, but making the key and keyseat is just as much of a challenge. I also thought of using 1mm grub screws for the key.

Oh, and of course, just drilling a 9mm hole. Too easy of course :-).

What are your suggestions?
10
  • Not a good woodworking answer, but have you considered finding a local maker space to see if someone could replicate the part in plastic? I'm not sure how you're planning on attaching your wooden carving to the plastic seat, but a plastic-plastic attachment may well be easier and more sturdy (adhesives designed for plastics) than a wood-plastic joint.
    – FreeMan
    Commented Oct 13, 2020 at 11:35
  • 1
    I agree with @FreeMan about using plastic, but if you must use wood, I'd suggest drilling an appropriately-sized hole and gluing in a roughly rectangular "tooth" (with a rounded side to match the curvature of the drilled hole) in the required position. It could also be done by drilling a preliminary hole and refining the shame with a small chisel or file. I think the glue option would be much easier.
    – gnicko
    Commented Oct 13, 2020 at 15:06
  • What I would probably do is drill a slightly oversized hole, wrap the shaft in cellophane or packing tape (including the keyway), then fill the hole with a high-quality 2-part epoxy (like West or Entropy) with an appropriate filler, making sure the keyway is filled. After the epoxy has cured remove the shaft, take the plastic lining off, and it should fit perfectly! Commented Oct 13, 2020 at 15:51
  • Re plastic: the plastic used by the manufacturer is heavy duty stuff. My experience with 3D printing is with very soft material, that would not stand up to the wear here.
    – simonpa71
    Commented Oct 13, 2020 at 16:19
  • 1
    Now that said. I suspect the way to do this is to get it 3D printed and then get that 3D print cast in metal..... cost should work out (just rough estimate here) 19 times the cost of a replacement seat ^_^
    – Graphus
    Commented Oct 14, 2020 at 11:51

1 Answer 1

2

While I would just chuck the thing and buy a new toilet seat, you seem to be attached to it so...

I'd suggest a non-woodworking solution: Find a maker space type of location near you and see if someone will help you recreate the part on a 3D printer. Offering some cash for their time and material may go a long way toward motivating a helper.

As a woodworking solution, I'd suggest:

  • Drill your 9mm main hole.
  • Drill a second hole ~2-3mm from the outside edge of the main hole as a starter point for the key.
  • Enlarge this hole to a dovetail shape, wide end away from the hole, narrow end opening into the main hole.
    • This could be accomplished with a small Dremel™ type tool, knives and chisels
    • The dovetail needs to be large enough to have some strength, yet small enough that it will fit into the space available. Maybe someone with more dovetail joinery experience than I could recommend a dimension or two, but my understanding is that the fit is more critical than the absolute size.
  • Cut a dovetail in a piece of wood to fit into the dovetail slot you carved above, and with a key to fit into your hinge pin.
    • The grain on the dovetail should run from the end of the key to the wide end of the dovetail. i.e. 90° to the direction of the grain in your picture of the key.
    • The way the grain runs in your example, it's likely to snap the tiny key piece off along the grain.
    • By running the grain 90° to that, you've got long grain along the direction that's taking the stress every time the seat is raised and lowered (and potentially dropped).
  • Assemble with standard wood glue
  • Profit!

To attach either a wood or plastic replacement hinge, I'd think you'd want to drill out a mortise into the portion of the hinge remaining with the seat, then fashion a tenon on the replacement part. You would want this to be a pretty snug fit, but I'd hand cut some channels along the length of the tenon then use epoxy to glue the hinge in place. The keyways will ensure that the tenon can bottom out in the mortise (allowing excess epoxy to be pressed out) and they'll remain filled with the epoxy and act as keyways similar to the one in your hinge pin.

2
  • Re key stress: the key is only turning the pin around its axis inside the lid and base hinges. No stress, ideally, unless it sticks. One section of the pin is rectangular and allows the lid and seat assembly to slip out of the C shaped hinges on the base fixed to the ceramic, but only at a specific angle. Many hours of design went into this seat :-)
    – simonpa71
    Commented Oct 14, 2020 at 16:25
  • Frankly, I'd be as concerned about snapping off the key while carving or installing as during use...
    – FreeMan
    Commented Oct 14, 2020 at 16:28

Your Answer

By clicking “Post Your Answer”, you agree to our terms of service and acknowledge you have read our privacy policy.

Not the answer you're looking for? Browse other questions tagged or ask your own question.