2

I know the simple answer is to cut the slats separately and making an assembly, I've done that before. This time I want to cut it from a single piece of 3/4 plywood. It will be approx. 3.5ft x 4ft when collapsed and approx. 6ft x 4ft extended with fingers/grooves about 1" in width... I want the slats skinny as it will also serve as a table.

I don't think a jig saw is the right tool; certainly not freehand.

I've considered making one side (forstner bits/table saw) and using that as a router template... but that seems like it would have to be very exact and a lot of wood waste.

I've also considered buying/using a dado blade set, but getting the step/spacing right seems problematic to me.

Or possibly contracting it out to have laser cut... not sure if that would be cost effective, or even possible at that thickness.

Anyone experienced with cutting something like this?

enter image description here

EDIT:

I think I have a good idea of how to do this with a plunge router and 1" bit.

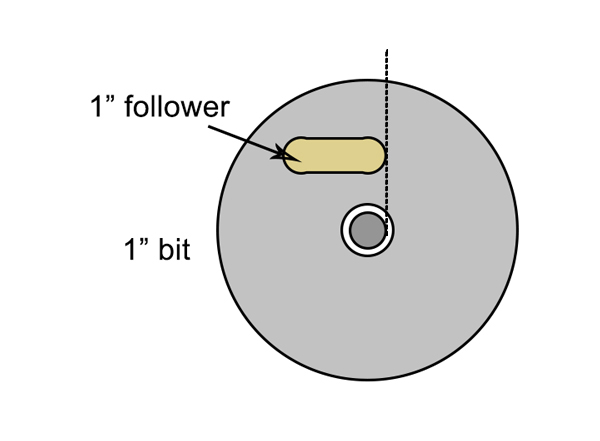
I'll cut the first slot using a fence attachment. And then I'll mount a 1" hardwood follower to the base... (I'm ok with drilling a couple holes in it).

Because the follower is effectively only a half fence I'll probably need to do a plunge entry for subsequent slots, and then rotate/switch directions for the exit. I could probably use the completed half as a template, or just repeat the process. I guess I could rout both halves as a single unit and then cut it in half/assemble/trim.

It will definitely be time consuming and wasteful, but I think it should work; and I can make the assembly for the cost of a sheet of plywood + a 1" router bit.

Any opinions?

enter image description here

FWIW, I have a 2.25HP Triton plunge router kit I can use for this.

5
  • 1
    I wish I could do this as a one-word Comment: laser.
    – Graphus
    Commented Feb 17, 2020 at 7:36
  • @Graphus, any idea of cost? I could get it waterjet cut, but the cost would be in the $200-300 range from what I'm hearing. Commented Feb 17, 2020 at 14:14
  • 1
    Couldn't even give you a ballpark I'm afraid, I'm sure the cost would go from reasonable for some people (I'm thinking if they had a makerspace in their city for example) to unfeasibly expensive for a lot of others (say if the only lasers in their neck of the woods were installed in professional cabinet shops or somewhere like that). And you'd have to locate them to begin with. But even more, without a digital plan in the right format for their machine they might not entertain the idea at all.... plenty of places are like that, you have to fit their setup or they're not interested full stop.
    – Graphus
    Commented Feb 17, 2020 at 17:57
  • If you wanted to complicate your life, you'd do this as a 3 ply glue-up, where the middle ply acted as a tongue/groove to stabilize the fingers... just sayin'... Commented Feb 18, 2020 at 1:27
  • @AloysiusDefenestrate, that is very interesting... but wow, yeah... complicated! Commented Feb 18, 2020 at 5:03

2 Answers 2

2

To make something like this from a single piece of ply I think the only reasonable way is by laser. This literally looked like a laser path when I first saw the image of your proposed design. Every other method I can think of, including CNC1, would create 'kerfs' wide enough that this would be hopelessly loose and floppy — 1/8" gaps?

In terms of how practical getting it laser cut is as discussed in the Comments, availability of a suitable laser locally and then the cost are potential issues. Obviously this is ruled out in some locations where there's no laser (or none that you can find), and in others the cost could be prohibitive. Is the design worth persevering with if the table ends up costing hundreds? I wouldn't have thought so when there are other ways of working around what you want to achieve here.

Not using just one piece
Now re. your edit and the idea of using a router with a follower, obviously this is one of a few ways you could do it. In essence you're creating a very long finger joint that will just interlock flat, instead of at 90°.

By likening it to finger joints it immediately highlights a potential problem though. Finger joints can often end up being very tight and require the joint to be tapped together using a mallet or a hammer with a protective block, even as short as they are. Take that same degree of tightness and multiply it by approximately 50 and you have an interlocking thing that you either couldn't push together at all, or without damaging the material irretrievably!

So you need to introduce just a smidge of slop. The easiest way to do this would be some light sanding2. Again multiply it up and it's quite a bit of sanding..... but at least it's for a one-off.


1 Which even if suitable could have the same potential pitfalls as a laser.

2 Being careful to maintain square edges. There's a tip for that in this previous Answer.

1
  • I marked this answer as correct: I was thinking I would likely have to run them all through my spindle sander after routing. The thing I really like about the router method is that it eliminates any layout/alignment issues. All I really have to do is get the first slot spaced accurately with a few test cuts in some scrap. And I can then use the first slot and a square to locate the follower. Once this piece is made, I could use it as a router template if I ever wanted to make another. Commented Feb 20, 2020 at 15:12
0

A plunge saw on a track (aka tracksaw) would be ideal for the long straight lines. Finish the corners with a jigsaw.

If the tracksaw is unavailable and you're very comfortable with a regular circular saw, you could do it with plunge cuts. Plunge cuts have the potential to be very unsafe (exposed blade, unstable saw, kickback, etc), so please proceed cautiously. You could set up a guide that would help you stay extra straight when cutting.

All this plunge stuff assumes you want to make both pieces out of one ~4x4 piece of ply. If the saw kerf (width of the blade) is an issue, you could subtly taper the fingers so they'd nest more tightly.

2
  • Thanks, I don't have a track saw. And my Porter Cable circular saw doesn't have a hinge type depth adjustment... plunge cuts with it are very unstable/inaccurate (at least when I make them). Commented Feb 17, 2020 at 14:19
  • 1
    I hear you on both counts. First and foremost, work safe. Hope someone has a better suggestion. Commented Feb 17, 2020 at 15:02

Your Answer

By clicking “Post Your Answer”, you agree to our terms of service and acknowledge you have read our privacy policy.

Not the answer you're looking for? Browse other questions tagged or ask your own question.